
Cheesy Taco Sticks Recipe for a Party Platter
Crispy, golden cheesy taco sticks emerge as a crowd-pleasing snack that promises pure comfort.
My kitchen always buzzes with excitement when these delectable treats start sizzling.
Friends cannot resist their irresistible blend of melted cheese and zesty seasoning.
Mexican-inspired flavors dance across your palate with each delightful bite.
Crunchy exteriors give way to a warm, gooey center that sparks instant joy.
Weekend gatherings demand something special, and these sticks deliver maximum satisfaction without complicated preparation.
Dive in and create magic that will have everyone asking for seconds.
Why Cheesy Taco Sticks Are A Crowd Favorite
All You Need For Cheesy Taco Sticks
Core Ingredients:Seasoning and Flavoring Group:Preparation and Finishing Group:How To Put Together Cheesy Taco Sticks
Step 1: Brown Savory Meat Filling
Cook ground beef in a skillet over medium-high heat until completely browned. Drain excess fat. Add these ingredients:Stir and simmer until liquid reduces, then remove from heat.
Step 2: Prepare Dough Base
Unroll pizza dough and stretch into a large rectangle. Slice dough into 12 equal squares across two baking sheets lined with parchment paper.
Step 3: Create Meat and Cheese Pockets
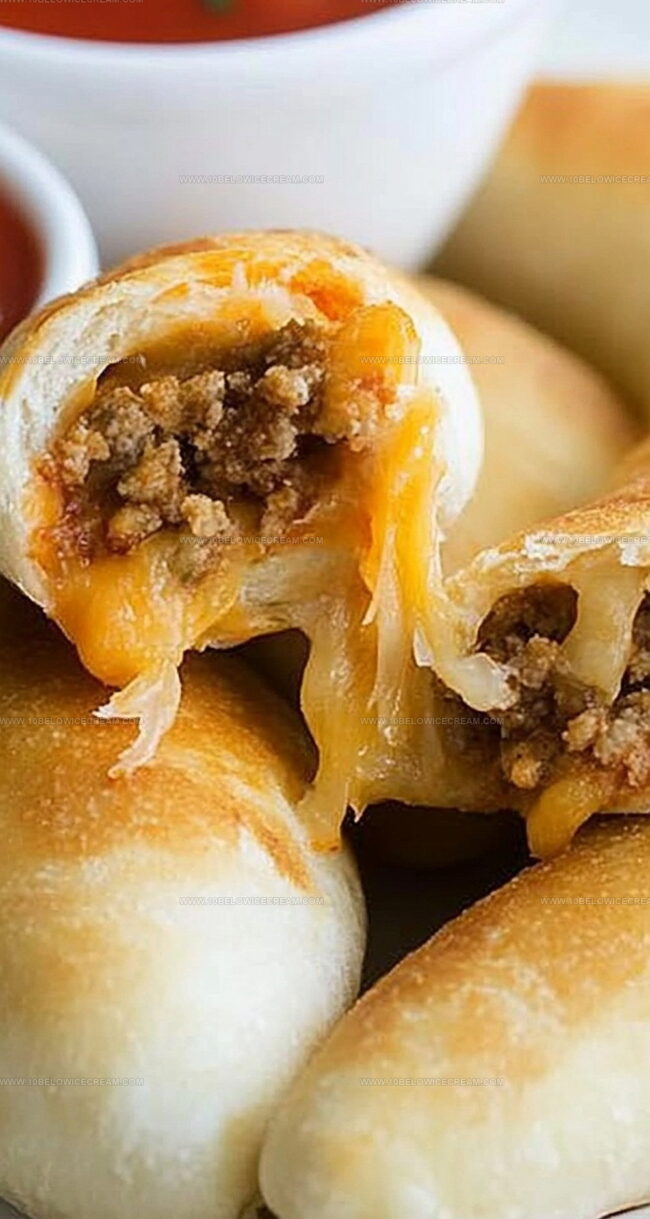
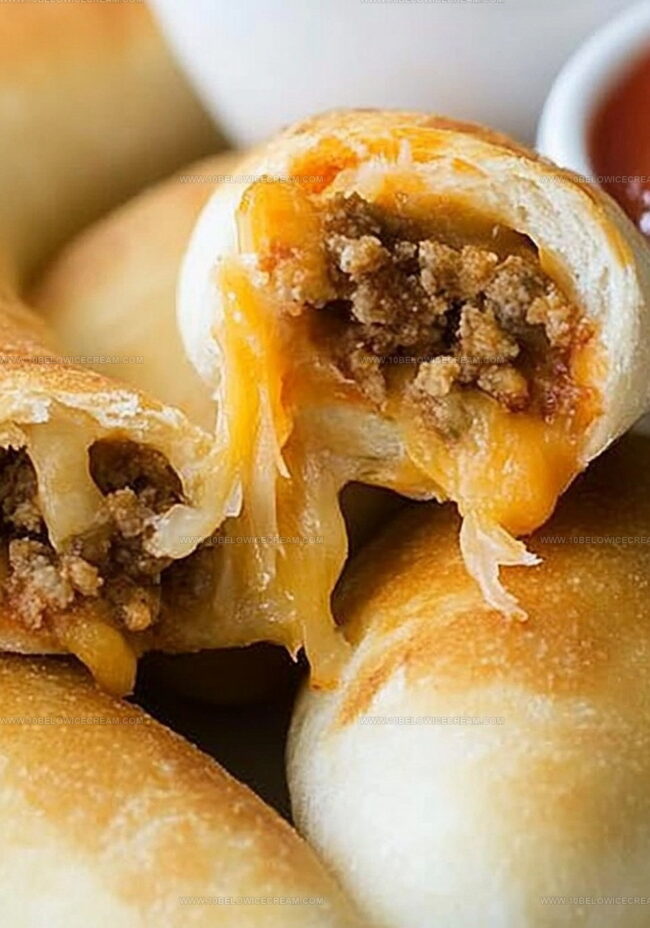
Spoon taco meat mixture into the center of each dough square. Place half a cheese stick on top of meat filling.
Step 4: Wrap and Seal Rolls
Carefully fold dough edges over filling, pinching seams tightly to prevent leaks. Fold and seal ends securely, positioning each roll seam-side down on baking sheet.
Step 5: Add Flavor Topping
Melt butter and mix with:Brush seasoned butter generously over top of each taco roll.
Step 6: Bake Until Golden
Bake in preheated oven at 425°F for 12-14 minutes until rolls turn puffy and golden brown. Remove and serve immediately while warm.
Best Pointers For Cheesy Taco Sticks
Different Styles Of Cheesy Taco Sticks
What To Eat With Cheesy Taco Sticks
How To Keep Cheesy Taco Sticks Fresh
Questions About Cheesy Taco Sticks
Ground beef, taco seasoning, and minced garlic create a savory and well-seasoned meat filling that gives these taco sticks their delicious taste.
Yes, ground turkey works perfectly as a lean protein alternative and will absorb the taco seasoning flavors just as well as ground beef.
No special cooking skills are required. The recipe is straightforward and easy to follow, making it perfect for home cooks of all skill levels.
Pinch the dough seams tightly and fold the edges completely over the filling to create a secure seal that prevents the meat and cheese from leaking during baking.
Print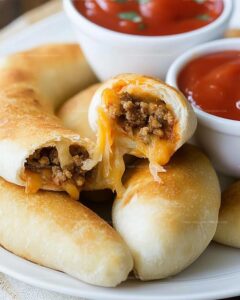
Cheesy Taco Sticks Recipe
- Total Time: 32 minutes
- Yield: 12 1x
Description
Mouthwatering cheesy taco sticks deliver a fiesta of flavors straight from Mexican street cuisine. Crispy tortilla rolls packed with seasoned meat and melted cheese create an irresistible handheld snack you’ll crave again and again.
Ingredients
Proteins:
- 1 pound lean ground beef
Cheese:
- 12 Colby Jack cheese sticks
Dough and Seasoning:
- 2 cans Pillsbury pizza dough
- 1 package taco seasoning
- 1/4 cup (4 tablespoons) unsalted butter
Herbs and Spices:
- 1 teaspoon minced garlic
- 1 teaspoon garlic powder
- 1 teaspoon dried parsley
Water:
- Water (as directed on taco seasoning package)
Instructions
- Warm the oven to 425°F and prepare two baking sheets with parchment paper.
- Maintain pizza dough chilled until preparation time.
- Brown ground beef in a skillet over medium-high heat for 5-7 minutes, eliminating excess grease.
- Incorporate garlic, taco seasoning, and recommended water amount. Simmer until liquid reduces, approximately 2-3 minutes. Remove from heat.
- Spread pizza dough on parchment-lined sheet, stretching into a 12×8-inch rectangle. Divide into twelve 4×4-inch squares across two dough sheets.
- Distribute taco meat centrally on each dough square, leaving modest border around edges.
- Position half a cheese stick atop meat filling for each square.
- Carefully encase filling by folding dough edges, pressing seams firmly to prevent leakage. Tuck and seal end sections, positioning each stick seam-side downward on baking sheet.
- Melt butter and combine with garlic powder and dried parsley. Generously brush mixture across taco stick surfaces.
- Bake 12-14 minutes until surfaces transform into golden, puffy texture. Serve immediately while warm for optimal enjoyment.
Notes
- Seal taco sticks tightly to prevent filling from leaking during baking, ensuring a clean and neat presentation.
- Experiment with different cheese varieties like pepper jack or sharp cheddar to add unique flavor profiles and personalize the dish.
- Use lean ground beef or substitute with ground turkey for a healthier protein option that maintains the recipe’s delicious taste.
- Prepare extra taco meat mixture and freeze for quick future meal prep, making weeknight dinners faster and more convenient.
- Prep Time: 15 minutes
- Cook Time: 17 minutes
- Category: Lunch, Dinner, Appetizer, Snacks
- Method: Baking
- Cuisine: Mexican
Nutrition
- Serving Size: 12
- Calories: 425 kcal
- Sugar: 2 g
- Sodium: 620 mg
- Fat: 27 g
- Saturated Fat: 12 g
- Unsaturated Fat: 13 g
- Trans Fat: 0.5 g
- Carbohydrates: 22 g
- Fiber: 1 g
- Protein: 24 g
- Cholesterol: 65 mg
Jackson Reid
Founder & Recipe Developer
Expertise
Education
Holyoke Community College – HCC-MGM Culinary Arts Institute
Certificate in Culinary Arts
Focus: Farm-to-table cuisine, sustainable cooking practices, and hands-on kitchen training
Jackson’s love for cooking began one dish at a time. After earning his Culinary Arts Certificate from Holyoke Community College’s HCC-MGM Culinary Arts Institute, he focused on what mattered most: creating recipes that are simple to follow and full of flavor.
At 10 Below Ice Cream, Jackson brings together global influences and a less-is-more approach. His recipes reflect his belief that good food doesn’t need to be complicated; it just needs to make sense, taste great, and feel right.
When he’s not testing ingredients or adjusting seasonings, you’ll find him hiking near Asheville, exploring local markets, or chasing the best light for food photos.