
Trisha Yearwood’s Buttery Dream: Butterscotch Bars Recipe
Crispy butterscotch bars have been my secret weapon for impressing guests at every gathering.
Sweet aromas waft through the kitchen while mixing these delectable treats.
Layers of rich, golden goodness promise an irresistible dessert experience.
Memories of southern comfort blend seamlessly with each buttery bite.
Simple ingredients come together in a magical culinary dance that feels like pure indulgence.
Our treasured recipe promises a delightful balance of crunch and smooth butterscotch flavor.
You’ll want to savor every single morsel of this heavenly creation.
Why Trisha Yearwoods Butterscotch Bars Are So Sweet
What You’ll Need For Trisha Yearwoods Butterscotch Bars
For the Base:For the Liquid Layer:For the Toppings and Garnish:How To Make Trisha Yearwoods Butterscotch Bars
Step 1: Prepare Baking Station
Warm up the oven to a cozy 350°F. Grab your 9×13-inch baking pan and coat it generously with butter or cooking spray to prevent any sticky situations.
Step 2: Create Crumbly Base
In a roomy mixing bowl, toss together:Mix everything until the texture resembles chunky sand that holds together when pressed.
Step 3: Form Solid Foundation
Press the crumbly mixture firmly into the prepared pan, creating an even, compact layer that will serve as the delicious base for your bars.
Step 4: Whip Up Liquid Magic
In a separate bowl, blend:Whisk until the mixture becomes silky smooth and perfectly combined.
Step 5: Fold in Butterscotch Goodness
Gently stir butterscotch chips into the liquid mixture, ensuring they’re evenly distributed for maximum flavor in every bite.
Step 6: Layer and Spread
Pour the butterscotch mixture over the flour base, spreading carefully to cover every inch of the crumbly foundation.
Step 7: Add Crunchy Toppings
Sprinkle across the top:This will create a delightful textural contrast and boost the flavor profile.
Step 8: Bake to Golden Perfection
Slide the pan into the preheated oven and bake for 25-30 minutes. Look for golden-brown edges and a center that’s set but still slightly soft.
Step 9: Cool and Set
Remove from the oven and let the bars rest in the pan for about an hour. Patience is key to achieving the perfect texture.
Step 10: Final Flourish
Optional but recommended: dust the cooled bars with a light snow of powdered sugar for an elegant finish.
Step 11: Slice and Serve
Cut into squares or rectangles. Serve at room temperature and watch them disappear!
Baking Tips For Trisha Yearwoods Butterscotch Bars
Fun Takes On Trisha Yearwoods Butterscotch Bars
Perfect Pairings For Trisha Yearwoods Butterscotch Bars
How To Store Trisha Yearwoods Butterscotch Bars Right
Your Trisha Yearwoods Butterscotch Bars Questions Answered
Yes, you can use chocolate chips or caramel chips as alternatives, but this will change the classic butterscotch flavor profile.
Look for golden brown edges and a center that appears set but slightly soft. The bars will continue to firm up as they cool.
These butterscotch bars work perfectly as both a dessert and a sweet snack, ideal for afternoon treats or after-dinner indulgence.
No, this recipe is beginner-friendly and requires basic mixing and baking techniques that even novice bakers can easily master.
Print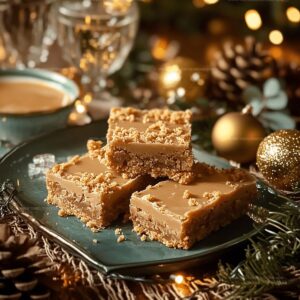
Trisha Yearwoods Butterscotch Bars Recipe
- Total Time: 1 hour 45 minutes
- Yield: 9 1x
Description
Trisha Yearwood’s butterscotch bars meld sweet nostalgia with Southern comfort in one irresistible dessert. Buttery layers of rich goodness promise a delightful escape that pulls you straight into a world of pure indulgence.
Ingredients
Flour and Base:
- 2 cups all-purpose flour
- 1 cup brown sugar
- 1/2 cup unsalted butter
- 1 tsp baking powder
- 1/4 tsp salt
Butterscotch and Sweet Elements:
- 1 cup butterscotch chips
- 1/2 cup sweetened condensed milk
- 1 large egg
- 1 tsp vanilla extract
- 1/4 cup light corn syrup
Topping and Garnish:
- 1/2 cup chopped pecans
- 1/4 cup additional butterscotch chips
- 2 tbsp powdered sugar (optional)
Instructions
- Preheat the oven to 350°F and thoroughly grease a 9×13-inch baking pan to ensure easy removal of bars.
- In a large mixing bowl, combine flour, brown sugar, softened butter, baking powder, and salt. Mix until the mixture forms a crumbly, cohesive base that resembles coarse sand.
- Press the prepared flour mixture firmly and evenly into the greased baking pan, creating a compact foundation for the bars.
- In a separate bowl, whisk together the egg, vanilla extract, sweetened condensed milk, and light corn syrup until smooth and well-integrated.
- Fold in the butterscotch chips into the liquid mixture, ensuring they are evenly distributed throughout.
- Pour the butterscotch mixture over the prepared flour base, spreading it carefully to cover the entire surface uniformly.
- Sprinkle chopped pecans and additional butterscotch chips across the top of the liquid layer for added texture and flavor complexity.
- Bake in the preheated oven for 25-30 minutes, or until the edges turn golden brown and the center appears set but slightly soft.
- Remove from the oven and allow the bars to cool completely in the pan for approximately 1 hour.
- Once cooled, dust with optional powdered sugar for a delicate finishing touch.
- Cut into square or rectangular portions and serve at room temperature.
Notes
- Elevate the texture by ensuring butter is at room temperature for seamless blending and a more uniform crumbly base.
- Opt for high-quality butterscotch chips to enhance the rich, caramel-like flavor profile of the bars.
- Prevent burning by checking the bars around the 20-minute mark and rotating the pan for even browning.
- Transform this dessert into a gluten-free option by substituting all-purpose flour with a reliable gluten-free flour blend.
- Prep Time: 15 minutes
- Cook Time: 30 minutes
- Category: Desserts, Snacks
- Method: Baking
- Cuisine: American
Nutrition
- Serving Size: 9
- Calories: 300
- Sugar: 25 g
- Sodium: 120 mg
- Fat: 14 g
- Saturated Fat: 7 g
- Unsaturated Fat: 6 g
- Trans Fat: 0 g
- Carbohydrates: 42 g
- Fiber: 1 g
- Protein: 3 g
- Cholesterol: 30 mg
Olivia Brooks
Contributing Writer
Expertise
Education
Culinary Institute of America
Accelerated Culinary Arts Certificate Program
Focus: Culinary fundamentals, nutrition, and healthy cooking technique
Olivia believes good food should feed both the body and the soul. She earned her Accelerated Culinary Arts Certificate from the Culinary Institute of America, where she focused on nutrition and practical cooking techniques that make healthy eating easy.
At 10 Below Ice Cream, Olivia shares single-serving recipes that are fresh, plant-forward, and full of heart. She loves helping people eat better, without stress, strict rules, or sacrificing flavor.
Beyond the kitchen, Olivia spends her time tending her backyard garden, practicing yoga, and discovering hidden gems in Portland’s food scene.