
The Classic Old Fashioned Custard Pie Recipe You’ll Adore
Creamy old fashioned custard pie brings memories of grandma’s kitchen wafting through my mind.
Soft vanilla notes dance across delicate pastry edges.
Nostalgic recipes often connect us to cherished moments from childhood.
Warm egg-based fillings create magical textures that melt smoothly on your tongue.
Simple ingredients combine with surprising elegance in this classic dessert.
Baking becomes an intimate journey of comfort and tradition.
Pure delight awaits you in every silky, rich slice.
Why The Old Fashioned Custard Pie Is So Creamy And Classic
What You’ll Need For The Old Fashioned Custard Pie
For the Pie Crust:For the Custard Base:For the Seasoning and Finishing:How To Make The Old Fashioned Custard Pie
Step 1: Prepare Oven and Pie Dish
Set your oven to 375°F and position the rack right in the center of the oven. Grab a 9-inch pie dish and gently press a pie crust into it, creating beautiful crimped edges that look professionally done.
Step 2: Whip Eggs to Perfection
Grab a large mixing bowl and whisk eggs until they become light and slightly frothy. This helps create that dreamy, silky custard texture everyone loves.
Step 3: Create Creamy Liquid Base
Pour whole milk and heavy cream into the whisked eggs. Stir continuously to blend everything into a smooth, dreamy liquid that will make your custard super luxurious.
Step 4: Season the Custard
Add these ingredients to your mixture:Whisk everything thoroughly so all ingredients dissolve completely and create a harmonious flavor profile.
Step 5: Strain for Silky Smoothness
Use a fine-mesh sieve to strain the entire custard mixture. This step removes any potential egg bits and ensures an ultra-smooth texture that’ll make your dessert look professionally made.
Step 6: Fill Pie Crust
Carefully pour the strained custard into your prepared pie crust. Move slowly to keep the crust’s delicate structure intact.
Step 7: Bake to Golden Perfection
Slide the pie into the preheated oven and bake for 35-40 minutes. You’re looking for a golden-brown surface with a center that’s set but still slightly jiggly.
Step 8: Cool and Rest
Remove the pie from the oven and let it cool completely at room temperature for 1-2 hours. Patience is key here!
Step 9: Add Finishing Touches
Dust the surface with a light sprinkle of ground cinnamon and powdered sugar for an elegant look that’ll impress anyone.
Step 10: Chill and Serve
Refrigerate the pie for at least 2 hours before serving. This helps the custard set perfectly and develop its rich, creamy texture that’ll make everyone swoon.
Tips For Baking The Old Fashioned Custard Pie
Tasty Variations Of The Old Fashioned Custard Pie
Great Pairings For The Old Fashioned Custard Pie
How To Store The Old Fashioned Custard Pie
FAQs About The Old Fashioned Custard Pie
Whole milk, heavy cream, and egg yolks create a rich, smooth texture by providing fat content and proteins that help thicken and bind the custard perfectly.
Bake the pie at a consistent temperature, avoid overbaking, and cool the pie gradually at room temperature to prevent sudden temperature changes that cause cracking.
Yes, you can prepare the pie a day in advance. Keep it refrigerated and the custard will continue to set, developing deeper flavor and smoother consistency.
Straining removes any potential egg strands or lumps, ensuring an ultra-smooth, silky texture that’s characteristic of a perfect classic custard pie.
Print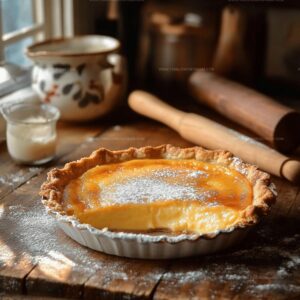
The Old Fashioned Custard Pie Recipe
- Total Time: 3 hours
- Yield: 8 1x
Description
Grandma’s classic Old Fashioned Custard Pie whispers nostalgic comfort from her vintage kitchen. Silky smooth filling nestled in a buttery crust promises a delightful journey through cherished family memories you’ll savor with each creamy bite.
Ingredients
Main Ingredients:
- 1 pie crust (9-inch)
- 4 large eggs
- 2 cups whole milk
- 1/2 cup heavy cream
- 1/2 cup granulated sugar
Flavoring Ingredients:
- 1 tsp vanilla extract
- 1/4 tsp ground nutmeg
- 1/4 tsp salt
Optional Garnish:
- 1 tbsp ground cinnamon
- 1 tbsp powdered sugar
Instructions
- Preheat the oven to 375°F and position the rack in the center, ensuring even heat distribution for perfect custard texture.
- Gently press the pie crust into a 9-inch pie dish, crimping the edges decoratively and creating a smooth, even surface.
- Whisk eggs in a large mixing bowl until they become light and slightly frothy, incorporating air for a silky custard consistency.
- Gradually pour whole milk and heavy cream into the whisked eggs, stirring continuously to create a smooth, homogeneous liquid base.
- Incorporate granulated sugar, vanilla extract, ground nutmeg, and salt into the mixture, whisking thoroughly to ensure all ingredients are fully integrated and dissolved.
- Carefully strain the custard mixture through a fine-mesh sieve to remove any potential egg strands and achieve an ultra-smooth texture.
- Slowly pour the strained custard into the prepared pie crust, taking care not to disturb the crust’s delicate structure.
- Bake for 35-40 minutes, or until the custard is set but still slightly jiggly in the center, with a golden-brown surface.
- Remove from the oven and allow the pie to cool completely at room temperature for approximately 1-2 hours.
- Once cooled, dust the surface with a delicate sprinkle of ground cinnamon and powdered sugar for an elegant finishing touch.
- Refrigerate for at least 2 hours before serving to allow the custard to fully set and develop its rich, creamy texture.
Notes
- Achieve a silky custard by whisking eggs thoroughly, incorporating air for a light, smooth texture that melts in your mouth.
- Strain the custard mixture through a fine-mesh sieve to eliminate any potential egg strands, guaranteeing an ultra-smooth, luxurious consistency.
- Customize the pie by experimenting with alternative spices like cardamom or adding a splash of bourbon for a sophisticated twist.
- Make it gluten-free by using a gluten-free pie crust or creating a crustless version, perfect for those with dietary restrictions.
- Prep Time: 20 minutes
- Cook Time: 40 minutes
- Category: Desserts
- Method: Baking
- Cuisine: American
Nutrition
- Serving Size: 8
- Calories: 270
- Sugar: 15g
- Sodium: 150mg
- Fat: 16g
- Saturated Fat: 9g
- Unsaturated Fat: 6g
- Trans Fat: 0g
- Carbohydrates: 27g
- Fiber: 0g
- Protein: 5g
- Cholesterol: 120mg
Olivia Brooks
Contributing Writer
Expertise
Education
Culinary Institute of America
Accelerated Culinary Arts Certificate Program
Focus: Culinary fundamentals, nutrition, and healthy cooking technique
Olivia believes good food should feed both the body and the soul. She earned her Accelerated Culinary Arts Certificate from the Culinary Institute of America, where she focused on nutrition and practical cooking techniques that make healthy eating easy.
At 10 Below Ice Cream, Olivia shares single-serving recipes that are fresh, plant-forward, and full of heart. She loves helping people eat better, without stress, strict rules, or sacrificing flavor.
Beyond the kitchen, Olivia spends her time tending her backyard garden, practicing yoga, and discovering hidden gems in Portland’s food scene.