Magical Reeses Dreamcake Recipe: Chocolate-Peanut Bliss Awaits
Crafting a decadent reeses dreamcake promises pure chocolate and peanut butter bliss that will make your taste buds dance.
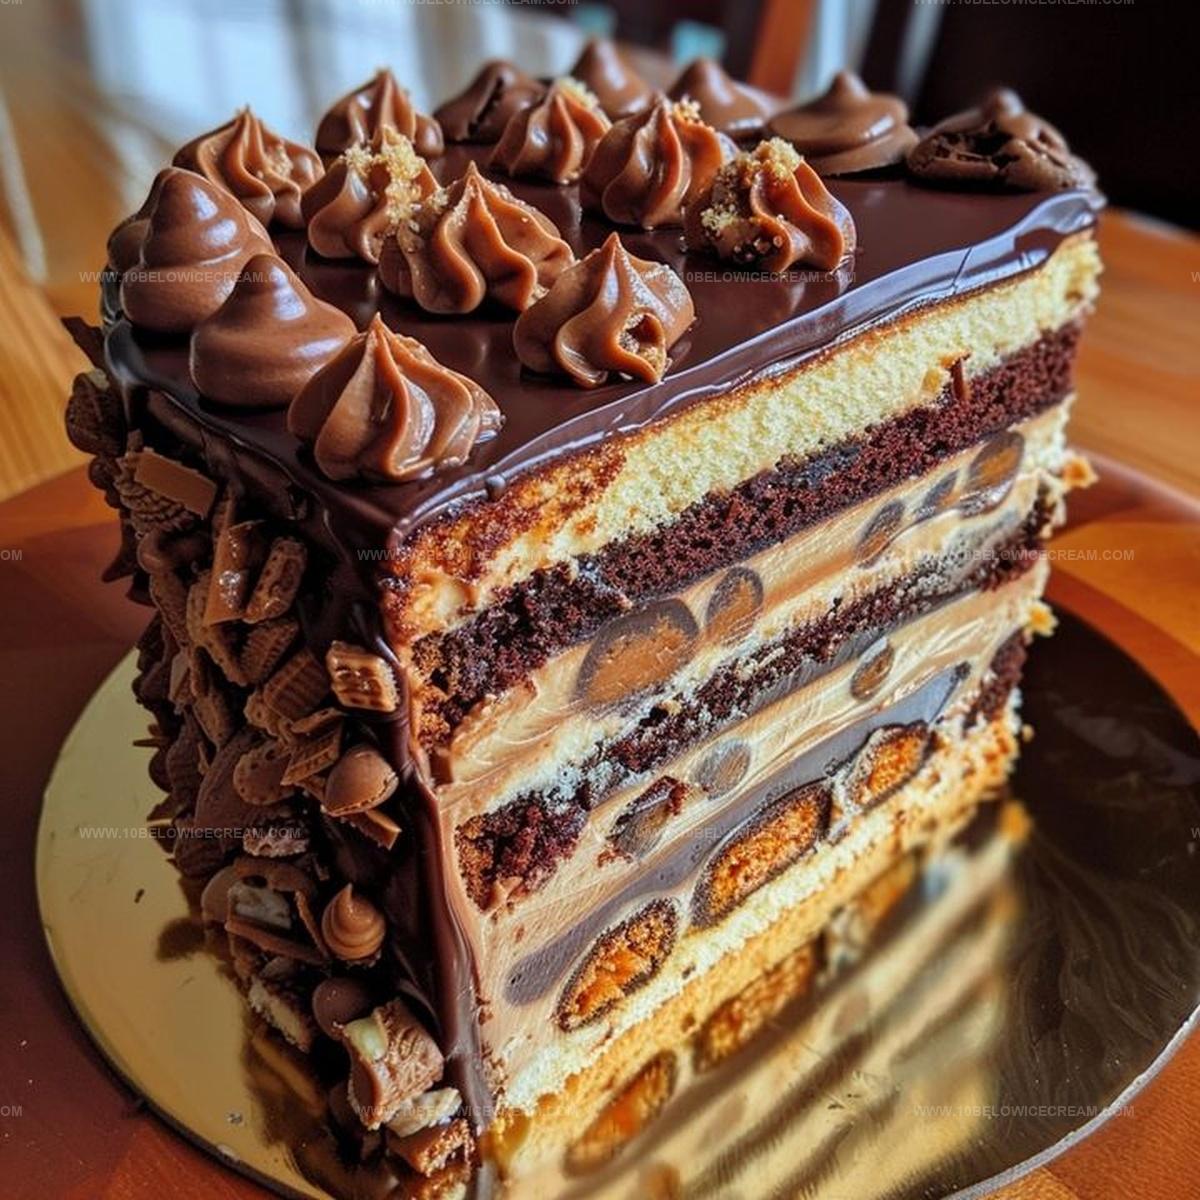
Sweet layers meld together in a symphony of rich flavors.
Chocolate lovers understand the magical combination of smooth peanut butter and deep cocoa notes.
Delightful crumbles of reese’s cups scattered throughout create unexpected texture and excitement.
Dessert enthusiasts know this cake delivers an indulgent experience beyond ordinary treats.
Each slice offers a perfect balance of creamy and crunchy elements.
Trust me, you want to roll up your sleeves and start mixing these irresistible ingredients right now.
The Magic Behind Reeses Dreamcake’s Irresistible Flavor
Must-Have Ingredients for Reeses Dreamcake Perfection
Cake Base Ingredients:Wet Ingredients:Cheesecake and Frosting Components:Step into Reeses Dreamcake: Your Easy Baking Guide
Step 1: Prepare Baking Equipment
Get your oven ready at 350°F. Grab two 9-inch round cake pans and an 8-inch springform pan. Grease and dust them with flour to prevent sticking.
Step 2: Mix Chocolate Cake Batter
Combine dry ingredients in a large mixing bowl:Add wet ingredients and blend until smooth:Stir in boiling water until batter becomes thin. Pour into prepared pans.
Step 3: Bake Chocolate Cake Layers
Slide pans into preheated oven. Bake for 30-35 minutes until a toothpick comes out clean. Let cakes rest in pans for 10 minutes, then transfer to cooling racks.
Step 4: Create Peanut Butter Cheesecake Layer
Blend cream cheese and peanut butter until creamy. Mix in sugar, then eggs one at a time. Add vanilla extract. Pour mixture into springform pan. Bake 35-40 minutes until set. Cool completely.
Step 5: Craft Creamy Frosting
Whip butter and peanut butter together. Gradually incorporate powdered sugar. Pour in heavy cream, vanilla, and salt. Beat on high speed until light and fluffy.
Step 6: Assemble Spectacular Cake
Place first chocolate cake layer on serving plate. Spread thin frosting layer. Carefully position cheesecake layer. Add another frosting layer. Top with second chocolate cake. Cover entire cake with remaining frosting.
Step 7: Final Decorative Touches
Sprinkle chopped Reeses peanut butter cups across the top. Optional: Drizzle with chocolate ganache for extra decadence.
Insider Secrets for an Unforgettable Reeses Dreamcake
Unique Twists to Elevate Your Reeses Dreamcake
Perfect Pairings to Complement Reeses Dreamcake
Best Storage Tips to Keep Reeses Dreamcake Fresh
Your Top Questions Answered About Reeses Dreamcake
Yes, you can use creamy or crunchy peanut butter. Just ensure it’s at room temperature for smooth mixing.
While it has multiple components, the recipe is straightforward. Follow each step carefully and you’ll create an impressive dessert.
Bake the cheesecake in a water bath and avoid overmixing the batter. Also, let it cool gradually to prevent sudden temperature changes.
Yes, you can prepare the cake layers and cheesecake a day in advance. Store them separately in the refrigerator and assemble when ready to serve.
Print
Reeses Dreamcake Recipe
- Total Time: 85-95 minutes
- Yield: 12 1x
Description
Indulgent Reeses Dreamcake blends chocolate and peanut butter magic into a heavenly dessert that delights chocolate enthusiasts. Sweet layers of rich ganache and creamy frosting promise a delectable journey for dessert lovers.
Ingredients
Cake Base:
- 2 cups (240 grams) all-purpose flour
- 2 cups (400 grams) granulated sugar
- 3/4 cup (75 grams) unsweetened cocoa powder
- 1 1/2 teaspoons (7.5 milliliters) baking powder
- 1 1/2 teaspoons (7.5 milliliters) baking soda
- 1 teaspoon (5 milliliters) salt
Wet Ingredients:
- 2 large eggs
- 1 cup (240 milliliters) whole milk
- 1/2 cup (120 milliliters) vegetable oil
- 2 teaspoons (10 milliliters) vanilla extract
Liquid Ingredient:
- 1 cup (240 milliliters) boiling water
Instructions
- Prepare the baking workspace by heating the oven to 350F (175C). Coat two 9-inch round cake pans and an 8-inch springform pan with grease and flour.
- Create the chocolate cake batter by combining dry ingredients in a large mixing bowl. Add wet ingredients and blend thoroughly for 2 minutes using an electric mixer. Incorporate boiling water, which will create a thin consistency. Distribute batter evenly across prepared pans.
- Bake chocolate cake layers for 30-35 minutes until a toothpick emerges clean when inserted into the center. Allow cakes to rest in pans for 10 minutes, then transfer to wire cooling racks.
- Prepare peanut butter cheesecake by whipping cream cheese and peanut butter until smooth. Gradually integrate sugar, then incorporate eggs individually. Fold in vanilla extract. Transfer mixture to springform pan and bake for 35-40 minutes until center sets. Cool completely.
- Whip frosting by blending butter and peanut butter until creamy. Slowly integrate powdered sugar. Add heavy cream, vanilla, and salt. Beat on high speed for 3 minutes until achieving a light, fluffy texture.
- Assemble the cake by positioning first chocolate layer on serving plate. Apply thin frosting layer. Gently place cheesecake layer, then spread additional frosting. Crown with second chocolate cake layer. Completely cover cake’s exterior with remaining frosting.
- Garnish by scattering chopped Reeses peanut butter cups across the top. Optional: drizzle with chocolate ganache for enhanced presentation.
Notes
- Ensure all ingredients are at room temperature for smooth mixing and even baking, preventing lumps in the batter.
- Use high-quality cocoa powder and pure vanilla extract to enhance the chocolate cake’s rich flavor profile.
- For a lighter cheesecake texture, avoid overmixing the batter and gently fold ingredients to prevent incorporating too much air.
- Consider using a water bath when baking the cheesecake layer to prevent cracking and create a silky smooth consistency.
- Chill the cake for at least an hour before serving to help the layers set and make slicing easier.
- Swap regular peanut butter with natural or low-sugar alternatives for a healthier version without compromising taste.
- Gluten-free bakers can substitute all-purpose flour with a gluten-free blend to accommodate dietary restrictions.
- Prep Time: 20 minutes
- Cook Time: 65-75 minutes
- Category: Desserts
- Method: Baking
- Cuisine: American
Nutrition
- Serving Size: 12
- Calories: 308 kcal
- Sugar: 29 g
- Sodium: 265 mg
- Fat: 13 g
- Saturated Fat: 2 g
- Unsaturated Fat: 11 g
- Trans Fat: 0 g
- Carbohydrates: 44 g
- Fiber: 3 g
- Protein: 4 g
- Cholesterol: 37 mg
Olivia Brooks
Contributing Writer
Expertise
Education
Culinary Institute of America
Accelerated Culinary Arts Certificate Program
Focus: Culinary fundamentals, nutrition, and healthy cooking technique
Olivia believes good food should feed both the body and the soul. She earned her Accelerated Culinary Arts Certificate from the Culinary Institute of America, where she focused on nutrition and practical cooking techniques that make healthy eating easy.
At 10 Below Ice Cream, Olivia shares single-serving recipes that are fresh, plant-forward, and full of heart. She loves helping people eat better, without stress, strict rules, or sacrificing flavor.
Beyond the kitchen, Olivia spends her time tending her backyard garden, practicing yoga, and discovering hidden gems in Portland’s food scene.