
Fluffy Pineapple Dream Dessert Recipe: A Taste of Paradise
Sweet memories of childhood summers flood back when I think about this delightful pineapple dream dessert that melts on your tongue.
Creamy layers promise pure tropical bliss in every single bite.
Soft, pillowy textures combine with bright fruit notes that dance across your palate.
Unexpected ingredients create a magical harmony of flavor and comfort.
Cool and refreshing, this dessert brings sunshine to any gathering.
Chilled perfection awaits you in just a few simple steps.
Indulge and let each spoonful transport you to a sweet paradise.
Why Pineapple Dream Dessert Is a Taste of Sunshine
What You Need to Build This Dreamy Dessert
For the Crust:For the Filling:For the Topping and Garnish:Layered, Light, and Lush – The Step-by-Step How-To
Step 1: Crush Graham Crackers
Transform graham crackers into fine, powdery crumbs using a food processor or rolling pin. Aim for a uniform, sandy texture that will create a perfect base for your tropical dessert.
Step 2: Create Cracker Crust
Melt butter completely and mix thoroughly with graham cracker crumbs. Press the mixture firmly into a 9×13 inch baking dish, creating a compact and even foundation for your treat.
Step 3: Whip Cream Cheese Mixture
Blend cream cheese until incredibly smooth and creamy. Gradually mix in powdered sugar, whisking until the mixture becomes light and free of any lumps.
Step 4: Prepare Pineapple Filling
Drain crushed pineapple meticulously, squeezing out excess moisture. Gently fold the pineapple into the cream cheese mixture, ensuring an even distribution of fruit throughout.
Step 5: Craft Whipped Topping
Combine whipped cream, sour cream, and vanilla extract. Blend until the mixture becomes silky smooth and beautifully integrated, creating a luxurious topping.
Step 6: Layer Pineapple Cream
Spread the pineapple-cream cheese mixture evenly over the graham cracker crust. Use a spatula to ensure complete and uniform coverage.
Step 7: Add Whipped Cream Layer
Carefully spread the whipped cream mixture on top of the pineapple layer. Create a smooth, elegant surface that promises delightful flavors.
Step 8: Chill and Set
Refrigerate the dessert for a minimum of 4 hours or overnight. This crucial step allows the flavors to meld and the texture to set perfectly.
Step 9: Sprinkle Toppings
Generously scatter:Across the top to add crunch and visual excitement.
Step 10: Add Final Garnish
Optionally, dot the surface with vibrant maraschino cherries for a classic tropical touch and burst of color.
Step 11: Serve and Enjoy
Slice into squares and serve chilled. Watch as your guests delight in the luscious layers of this tropical dream dessert.
Tips for a Sky-High Fluffy Pineapple Dessert
Flavor Swaps That Keep Things Interesting
Pair This Dessert With Even More Sweet Bliss
How to Keep It Dreamy in the Fridge
Dream Dessert Dilemmas? Not Anymore
Low-fat cream cheese can work, but it might result in a slightly less creamy texture. For the best consistency and flavor, full-fat cream cheese is recommended.
Yes, thoroughly draining the pineapple prevents excess moisture that could make the dessert watery and compromise the texture of the layers.
Absolutely! This dessert actually tastes better when prepared in advance. You can make it up to 2 days before serving, keeping it refrigerated until ready to enjoy.
No problem. You can place graham crackers in a sealed plastic bag and crush them with a rolling pin or the bottom of a heavy pan to create fine crumbs.
Print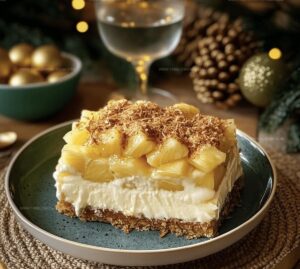
Pineapple Dream Dessert Recipe
- Total Time: 4 hours 30 minutes
- Yield: 8 1x
Description
Creamy, dreamy Pineapple Dream Dessert whisks classic tropical flavors into a heavenly no-bake treat. Cool layers of smooth cream cheese, sweet pineapple, and fluffy whipped topping create pure dessert magic that sweeps you straight to paradise.
Ingredients
Main Ingredients:
- 2 cups graham cracker crumbs
- 1/2 cup unsalted butter
- 16 oz cream cheese
- 1 cup powdered sugar
- 20 oz crushed pineapple
Creamy Filling:
- 1 cup whipped cream
- 1/2 cup sour cream
- 1 tsp vanilla extract
Topping:
- 1/2 cup shredded coconut
- 1/4 cup chopped pecans
- 1/4 cup maraschino cherries (optional)
Instructions
- Pulverize graham crackers into fine, uniform crumbs using a food processor or rolling pin, ensuring a consistent texture for the base layer.
- Melt butter completely and thoroughly combine with graham cracker crumbs, pressing the mixture firmly into a 9×13 inch baking dish to create a compact, even crust.
- Whip cream cheese until smooth and velvety, gradually incorporating powdered sugar to achieve a light, airy consistency without lumps.
- Drain crushed pineapple meticulously, removing excess liquid to prevent a watery filling, then gently fold into the cream cheese mixture.
- Blend whipped cream, sour cream, and vanilla extract until silky and well-integrated, maintaining a soft, luxurious texture.
- Delicately layer the pineapple-cream cheese mixture over the graham cracker crust, spreading evenly with a spatula to ensure complete coverage.
- Carefully spread the whipped cream mixture on top of the pineapple layer, creating a smooth, elegant surface.
- Refrigerate the dessert for at least 4 hours or overnight, allowing flavors to meld and texture to set completely.
- Before serving, generously sprinkle shredded coconut and chopped pecans across the top for added crunch and visual appeal.
- Optionally, garnish with vibrant maraschino cherries for a pop of color and classic tropical flair.
- Slice into squares and serve chilled, revealing the luscious layers of this dreamy tropical dessert.
Notes
- Crush graham crackers using a sealed plastic bag and rolling pin for less mess and easier cleanup.
- Use room temperature cream cheese to prevent lumps and ensure smooth blending.
- Squeeze crushed pineapple in a clean kitchen towel to remove maximum moisture, preventing soggy crust.
- Swap graham crackers with gluten-free alternatives like almond flour or gluten-free cookie crumbs for dietary restrictions.
- Prep Time: 30 minutes
- Cook Time: 0 minutes
- Category: Desserts
- Method: None
- Cuisine: American
Nutrition
- Serving Size: 8
- Calories: 400
- Sugar: 20 g
- Sodium: 200 mg
- Fat: 25 g
- Saturated Fat: 15 g
- Unsaturated Fat: 8 g
- Trans Fat: 0 g
- Carbohydrates: 40 g
- Fiber: 2 g
- Protein: 5 g
- Cholesterol: 70 mg
Jackson Reid
Founder & Recipe Developer
Expertise
Education
Holyoke Community College – HCC-MGM Culinary Arts Institute
Certificate in Culinary Arts
Focus: Farm-to-table cuisine, sustainable cooking practices, and hands-on kitchen training
Jackson’s love for cooking began one dish at a time. After earning his Culinary Arts Certificate from Holyoke Community College’s HCC-MGM Culinary Arts Institute, he focused on what mattered most: creating recipes that are simple to follow and full of flavor.
At 10 Below Ice Cream, Jackson brings together global influences and a less-is-more approach. His recipes reflect his belief that good food doesn’t need to be complicated; it just needs to make sense, taste great, and feel right.
When he’s not testing ingredients or adjusting seasonings, you’ll find him hiking near Asheville, exploring local markets, or chasing the best light for food photos.