
Irresistible Pillsbury Biscuit Garlic Butter Cheese Bombs Recipe
Crispy, golden pillsbury biscuit garlic butter cheese bombs promise a mouthwatering adventure for anyone seeking comfort food with a delightful twist.
Soft dough hugs melted cheese in a magical embrace that sparks instant hunger.
Each bite delivers a perfect balance of buttery richness and savory garlic notes.
Cheese oozes from these delectable parcels, creating irresistible moments of pure culinary joy.
Minimal ingredients and quick preparation make these bombs a weekend favorite for lazy afternoons.
Simple kitchen skills are all you need to craft these crowd-pleasing delights.
One taste, and you’ll understand why these cheesy treasures become instant dinner champions.
Prepare to wow everyone at the table with this ridiculously addictive snack.
Why Pillsbury Biscuit Garlic Butter Cheese Bombs Are a Crowd-Pleaser
Ingredients Needed for Pillsbury Biscuit Garlic Butter Cheese Bombs
Main Ingredients:Flavor Enhancers:Coating and Topping:How to Make Pillsbury Biscuit Garlic Butter Cheese Bombs
Step 1: Prepare Baking Surface
Line a baking sheet with parchment paper or lightly grease it to prevent sticking and ensure easy cleanup.
Step 2: Separate Biscuit Dough
Open the Pillsbury biscuit can and gently separate each biscuit, creating individual rounds ready for filling.
Step 3: Create Cheese Pocket
Carefully stretch each biscuit dough slightly to create a small pocket in the center. Add these ingredients:Fold the dough edges over the cheese, pinching and sealing completely to prevent leaking during baking.
Step 4: Craft Garlic Butter Coating
In a small bowl, mix together:Step 5: Brush and Prepare
Generously brush each prepared biscuit bomb with the garlic butter mixture, ensuring complete coverage.
Step 6: Bake to Golden Perfection
Place the prepared biscuit bombs on the prepared baking sheet, leaving space between each one. Bake in the preheated oven until they turn golden brown and puffy, typically 10-12 minutes.
Step 7: Cool and Serve
Remove the biscuit bombs from the oven and let them cool for a few minutes. Serve warm for the best melty, cheesy experience.
Pro Tips for Pillsbury Biscuit Garlic Butter Cheese Bombs
Variations to Try with Pillsbury Biscuit Garlic Butter Cheese Bombs
Pairing Suggestions for Pillsbury Biscuit Garlic Butter Cheese Bombs
Best Ways to Store Pillsbury Biscuit Garlic Butter Cheese Bombs
FAQs on Pillsbury Biscuit Garlic Butter Cheese Bombs
Gently separate each biscuit using your fingers, being careful not to stretch or tear the dough.
Yes, shredded mozzarella, cheddar, or pepper jack work great as alternatives to the recommended cheese.
You can use garlic powder as a substitute, using about 1/2 teaspoon for the same flavor profile.
These garlic butter cheese bombs are most delicious when served warm, right after baking when the cheese is melty and the biscuits are golden brown.
Print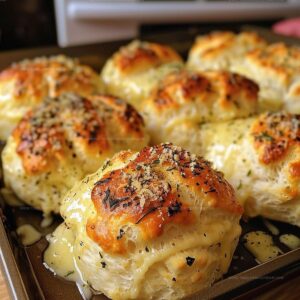
Pillsbury Biscuit Garlic Butter Cheese Bombs Recipe
- Total Time: Not specified
- Yield: 8 1x
Description
Pillsbury biscuit garlic butter cheese bombs elevate comfort food with irresistible cheesy goodness. Melted cheese, garlic-infused butter, and golden-brown biscuits create a crowd-pleasing appetizer you’ll crave at every gathering.
Ingredients
Main Ingredients:
- 1 (16 ounces) container refrigerated biscuit dough (8 biscuits)
- 4 ounces mozzarella cheese
Cheese Coating:
- 4 tablespoons melted butter
- 1 teaspoon garlic powder
- 1 teaspoon Italian seasoning
Seasoning:
- 1 pinch salt
Instructions
- Preheat oven to 375°F (190°C) and prepare a baking sheet with parchment paper or light grease to ensure effortless baking and easy cleanup.
- Carefully separate each biscuit from the package, creating a soft, pillowy foundation for the upcoming flavor transformation.
- Gently flatten each biscuit round with your fingertips, creating a delicate canvas that will cradle the rich cheese and herbs.
- Place a generous cube of cream cheese directly in the center of each flattened biscuit, positioning it as the decadent core of these savory bombs.
- Sprinkle shredded cheddar cheese over the cream cheese, adding an extra layer of melty, golden goodness.
- Carefully fold the biscuit edges over the cheese, pinching and sealing the sides to create a completely enclosed pocket that will prevent cheese from leaking during baking.
- Roll each sealed biscuit bomb between your palms to create a smooth, uniform round shape that ensures even cooking.
- Melt butter and mix with minced garlic, fresh parsley, and a pinch of salt to create a fragrant, herb-infused coating.
- Generously brush each biscuit bomb with the garlic butter mixture, ensuring complete coverage for maximum flavor and a gorgeous golden exterior.
- Arrange the prepared bombs on the prepared baking sheet, leaving slight space between each for proper heat circulation.
- Bake in the preheated oven for 10-12 minutes, or until the biscuits turn a beautiful golden brown and appear puffy and crisp.
- Remove from oven and let cool for 2-3 minutes before serving to allow the cheese to set and prevent burning.
Notes
- Ensure the cream cheese is softened at room temperature for easier mixing and smoother filling.
- Gently separate each biscuit and flatten slightly to create a more even surface for stuffing.
- Use a sharp knife or kitchen scissors to cut cheese into small, uniform cubes that melt evenly inside the biscuit.
- Brush garlic butter generously just before baking to enhance flavor and create a golden, crispy exterior.
- Prep Time: Not specified
- Cook Time: Not specified
- Category: Appetizer, Snacks
- Method: Baking
- Cuisine: American
Nutrition
- Serving Size: 8
- Calories: 248 kcal
- Sugar: 1 g
- Sodium: 383 mg
- Fat: 16 g
- Saturated Fat: 9 g
- Unsaturated Fat: 6 g
- Trans Fat: 0.5 g
- Carbohydrates: 19 g
- Fiber: 1 g
- Protein: 7 g
- Cholesterol: 43 mg
Olivia Brooks
Contributing Writer
Expertise
Education
Culinary Institute of America
Accelerated Culinary Arts Certificate Program
Focus: Culinary fundamentals, nutrition, and healthy cooking technique
Olivia believes good food should feed both the body and the soul. She earned her Accelerated Culinary Arts Certificate from the Culinary Institute of America, where she focused on nutrition and practical cooking techniques that make healthy eating easy.
At 10 Below Ice Cream, Olivia shares single-serving recipes that are fresh, plant-forward, and full of heart. She loves helping people eat better, without stress, strict rules, or sacrificing flavor.
Beyond the kitchen, Olivia spends her time tending her backyard garden, practicing yoga, and discovering hidden gems in Portland’s food scene.