
The Easiest No Knead Roasted Garlic Bread Recipe Ever
Baking a delightful no knead roasted garlic bread brings pure comfort to your kitchen.
Fragrant cloves of garlic infuse incredible depth into this simple recipe.
Minimal effort transforms ordinary ingredients into an extraordinary loaf that fills your home with warmth.
Soft, crusty edges promise a delectable experience for anyone who loves fresh bread.
The magic happens with just a few basic pantry staples and some patient resting time.
Crisp exterior and tender interior combine in a way that makes store-bought bread seem bland.
Savor each slice and let the rich, roasted garlic flavor transport you to culinary bliss.
What’s Special About No Knead Roasted Garlic Bread
Ingredients for No Knead Roasted Garlic Bread
For the Base:For the Liquid:For the Aromatics and Seasonings:Steps to Bake No Knead Roasted Garlic Bread
Step 1: Mix Dry Ingredients
Grab a large mixing bowl and toss in bread flour, salt, and active dry yeast. Stir these ingredients together to create a solid base for your rustic bread creation.
Step 2: Create Initial Dough
Pour water into the flour mixture, mixing until a rough, shaggy dough emerges. Make sure no dry flour remains in the bowl.
Step 3: Enhance with Roasted Garlic
Gently crush the roasted garlic cloves and fold them into the dough, spreading their intense flavor throughout the mixture.
Step 4: Add Aromatic Seasonings
Drizzle olive oil over the dough, then sprinkle dried rosemary and black pepper. Carefully incorporate these ingredients to distribute their flavors evenly.
Step 5: Allow First Fermentation
Cover the bowl with plastic wrap and let the dough rest at room temperature for 12-18 hours. This slow fermentation develops deep, complex flavors.
Step 6: Shape the Dough
Transfer the risen dough onto a generously floured surface. Gently shape it into a loose round, being careful not to overwork the dough.
Step 7: Prepare for Second Rise
Dust a clean kitchen towel with cornmeal and place the dough on it. Cover and let it rise for 1-2 hours until it becomes puffy and soft.
Step 8: Prepare the Oven
Preheat a heavy Dutch oven with its lid to 450°F for 30 minutes. This creates an intense, hot cooking environment for perfect bread.
Step 9: Bake the Bread
Carefully slide the dough into the scorching hot Dutch oven. Use a sharp knife to score the top, allowing steam to escape during baking.
Step 10: Complete the Baking Process
Bake covered for 30 minutes, then remove the lid and continue baking for 15-20 minutes. Watch for a golden brown, crispy crust to develop.
Step 11: Add Final Touch
Sprinkle coarse sea salt over the hot bread immediately after removing from the oven for an extra burst of flavor.
Step 12: Cool and Serve
Let the bread cool on a wire rack for at least 1 hour before slicing. This allows the internal structure to set perfectly, ensuring the best texture.
Handy Tips for No Knead Roasted Garlic Bread
Bread Style Ideas for No Knead Roasted Garlic Bread
Tasty Matches for No Knead Roasted Garlic Bread
Storing No Knead Roasted Garlic Bread Easily
No Knead Roasted Garlic Bread FAQs
Bread flour is ideal due to its high protein content, which helps develop strong gluten networks and creates a chewy, robust texture with excellent rise.
Roasted garlic adds a mellow, sweet, and slightly nutty undertone that infuses the entire loaf with a rich, complex flavor profile without overwhelming the other ingredients.
Long fermentation allows natural yeast development, enhances bread’s digestibility, deepens flavor complexity, and creates a more nuanced, tangy taste compared to quick-rise methods.
Print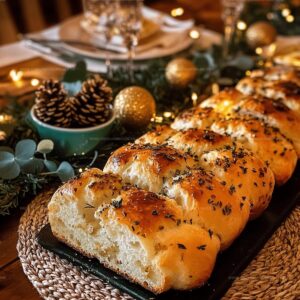
No Knead Roasted Garlic Bread Recipe
- Total Time: 12-19 hours and 50 minutes
- Yield: 8 1x
Description
Roasted garlic bread elevates humble ingredients into a sensory masterpiece of comfort and flavor. Crusty exterior and pillowy interior promise a delightful experience you’ll savor with each warm, aromatic slice.
Ingredients
Main Ingredients:
- 3 cups bread flour
- 1.5 tsp salt
- 1/4 tsp active dry yeast
- 1.5 cups water
- 6 cloves roasted garlic
Flavor Enhancers:
- 2 tbsp olive oil
- 1 tsp dried rosemary
- 1/2 tsp black pepper
Optional Topping:
- 1 tbsp coarse sea salt
- 1 tbsp cornmeal (for dusting)
Instructions
- In a spacious mixing bowl, combine bread flour, salt, and active dry yeast, creating a dry foundation for your artisan-style bread.
- Pour water into the flour mixture, stirring until a shaggy, rough dough forms with no dry pockets visible.
- Incorporate roasted garlic cloves, gently crushing them to distribute their rich, mellow flavor throughout the dough.
- Drizzle olive oil over the dough, then sprinkle dried rosemary and black pepper, folding these aromatics into the mixture.
- Cover the bowl with plastic wrap and let the dough rest at room temperature for 12-18 hours, allowing slow fermentation to develop complex flavors.
- After rising, transfer the dough onto a generously floured surface, gently shaping it into a loose round without excessive handling.
- Dust a clean kitchen towel with cornmeal and place the dough on it, covering and letting it rise for an additional 1-2 hours until puffy.
- Preheat a heavy Dutch oven with lid to 450°F for 30 minutes, ensuring an extremely hot cooking environment.
- Carefully slide the dough into the scorching hot Dutch oven, scoring the top with a sharp knife to allow steam escape.
- Bake covered for 30 minutes, then remove the lid and continue baking for 15-20 minutes until the crust turns golden brown and crispy.
- Remove from oven and sprinkle coarse sea salt over the hot bread for a final flavor enhancement.
- Cool the bread on a wire rack for at least 1 hour before slicing to allow internal structure to set properly.
Notes
- Customize your bread’s flavor by roasting different types of garlic like black garlic or elephant garlic for unique taste profiles.
- Experiment with alternative flour blends like whole wheat or spelt to create more nutritious and complex bread textures.
- Prevent sticking by using parchment paper when transferring dough into the hot Dutch oven, ensuring easier handling and cleaner results.
- Enhance the bread’s aromatic potential by adding herbs like thyme, sage, or oregano alongside the rosemary for deeper flavor complexity.
- Prep Time: 12-18 hours
- Cook Time: 45-50 minutes
- Category: Snacks, Appetizer
- Method: Baking
- Cuisine: Italian
Nutrition
- Serving Size: 8
- Calories: 230
- Sugar: 0.5 g
- Sodium: 400 mg
- Fat: 3.5 g
- Saturated Fat: 0.5 g
- Unsaturated Fat: 3 g
- Trans Fat: 0 g
- Carbohydrates: 47 g
- Fiber: 2 g
- Protein: 7 g
- Cholesterol: 0 mg
Olivia Brooks
Contributing Writer
Expertise
Education
Culinary Institute of America
Accelerated Culinary Arts Certificate Program
Focus: Culinary fundamentals, nutrition, and healthy cooking technique
Olivia believes good food should feed both the body and the soul. She earned her Accelerated Culinary Arts Certificate from the Culinary Institute of America, where she focused on nutrition and practical cooking techniques that make healthy eating easy.
At 10 Below Ice Cream, Olivia shares single-serving recipes that are fresh, plant-forward, and full of heart. She loves helping people eat better, without stress, strict rules, or sacrificing flavor.
Beyond the kitchen, Olivia spends her time tending her backyard garden, practicing yoga, and discovering hidden gems in Portland’s food scene.