
The Creamiest No Bake Pumpkin Cheesecake Balls Recipe Ever
Creamy pumpkin cheesecake balls make autumn’s most delightful no-bake treat that practically melts in your mouth.
Sweet memories of seasonal gatherings dance through every bite.
Compact spheres packed with warm spices bring instant comfort to chilly afternoons.
Minimal kitchen skills work perfectly for crafting these delectable morsels.
Simple ingredients from your pantry create magical moments of indulgence.
Smooth cream cheese blends seamlessly with rich pumpkin essence, creating irresistible little spheres.
You’ll fall in love with these bite-sized wonders that promise pure dessert bliss.
Pairing Suggestions for No Bake Pumpkin Cheesecake Balls
Storage Advice for No Bake Pumpkin Cheesecake Balls
FAQs for No Bake Pumpkin Cheesecake Balls
While not a diet food, they offer a lighter dessert option with natural pumpkin and moderate sugar content. They’re portion-controlled and provide a guilt-free sweet treat.
Absolutely! These balls can be prepared 2-3 days in advance and stored in the refrigerator. They actually taste better after the flavors have melded together.
No special equipment required. You’ll just need a mixing bowl, spoon, and your hands to roll the balls. A standard kitchen setup works perfectly.
Chilling the mixture before rolling is key. Ensure you refrigerate for at least 30 minutes, and keep the balls cold between steps to maintain their shape.
Reasons to Enjoy No Bake Pumpkin Cheesecake Balls
Ingredients Needed for No Bake Pumpkin Cheesecake Balls
Main Ingredients:Coating Ingredients:Flavor Enhancers:How to Prepare No Bake Pumpkin Cheesecake Balls
Step 1: Blend Creamy Pumpkin Mixture
In a large mixing bowl, combine the following ingredients:Whisk everything together until the mixture becomes silky smooth and all ingredients are perfectly incorporated.
Step 2: Chill and Firm
Place the pumpkin mixture into the refrigerator for approximately 30 minutes. This cooling period helps the mixture become more solid and easier to shape.
Step 3: Shape Delightful Balls
Remove the chilled mixture from the refrigerator. Using a small scoop or spoon, carefully create bite-sized portions. Gently roll each portion between your palms to form perfect round balls.
Step 4: Coat with Crunchy Graham Cracker
Crush graham crackers into fine crumbs. Roll each pumpkin ball completely in the cracker crumbs, ensuring a full and even coating that adds delightful texture.
Step 5: Optional Chocolate Dipping
If desired, melt white chocolate in a microwave-safe bowl. Carefully dip each graham cracker-coated ball into the melted chocolate, creating an extra layer of decadence. Return the balls to the refrigerator to allow the chocolate to set completely.
Step 6: Serve and Enjoy
Once the chocolate has hardened, your pumpkin cheesecake balls are ready to be served. Store in the refrigerator until you’re ready to indulge in these delectable treats.
Pro Tips for No Bake Pumpkin Cheesecake Balls
Variation Ideas for No Bake Pumpkin Cheesecake Balls
Print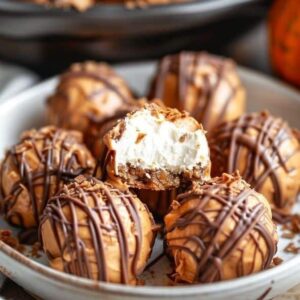
No Bake Pumpkin Cheesecake Balls Recipe
- Total Time: 45 minutes
- Yield: 8 1x
Description
Creamy no bake pumpkin cheesecake balls blend autumn’s warmth with smooth cream cheese and graham cracker goodness. Bite-sized delights roll perfectly for holiday gatherings, offering sweet comfort that will delight dessert enthusiasts.
Ingredients
Main Ingredients:
- 1 cup (240 ml) pumpkin puree
- 8 ounces (226 grams) cream cheese, softened
- 1 cup (120 grams) crushed graham crackers
Sweeteners and Flavoring:
- 1/2 cup (60 grams) powdered sugar
- 1 teaspoon vanilla extract
- 1 teaspoon pumpkin spice
Optional Coating:
- 1/2 cup (85 grams) white chocolate chips
Instructions
- Blend pumpkin puree, cream cheese, powdered sugar, vanilla extract, and pumpkin spice in a large mixing bowl until achieving a silky, uniform consistency.
- Chill the mixture in the refrigerator for approximately 30 minutes, allowing it to solidify and become easier to handle.
- Using a small scoop or spoon, portion out the chilled mixture and gently shape into uniform spherical forms with clean hands.
- Create a separate shallow dish with finely crushed graham crackers and methodically roll each ball until completely enveloped in the crumbly coating.
- Optional gourmet enhancement: melt white chocolate using a double boiler or microwave, carefully dipping each graham-coated ball to create an elegant, smooth exterior layer.
- Return the decorated balls to the refrigerator for an additional 15-20 minutes, ensuring the chocolate sets and the treats become firm and cool.
- Transfer to a serving platter or storage container, keeping chilled until ready to enjoy these delectable no-bake pumpkin cheesecake spheres.
Notes
- Chill thoroughly to ensure the mixture holds its shape perfectly when rolling into balls.
- Use full-fat cream cheese for the richest, most creamy texture that won’t crumble easily.
- Keep hands slightly damp while rolling to prevent the mixture from sticking and create smoother balls.
- For gluten-free version, swap graham crackers with crushed gluten-free cookies or toasted nuts for coating.
- Prep Time: 15 minutes
- Cook Time: 0 minutes
- Category: Desserts, Snacks
- Method: Refrigerating
- Cuisine: American
Nutrition
- Serving Size: 8
- Calories: 180 kcal
- Sugar: 14 g
- Sodium: 150 mg
- Fat: 11 g
- Saturated Fat: 7 g
- Unsaturated Fat: 3 g
- Trans Fat: 0.1 g
- Carbohydrates: 17 g
- Fiber: 1.5 g
- Protein: 3 g
- Cholesterol: 40 mg
Olivia Brooks
Contributing Writer
Expertise
Education
Culinary Institute of America
Accelerated Culinary Arts Certificate Program
Focus: Culinary fundamentals, nutrition, and healthy cooking technique
Olivia believes good food should feed both the body and the soul. She earned her Accelerated Culinary Arts Certificate from the Culinary Institute of America, where she focused on nutrition and practical cooking techniques that make healthy eating easy.
At 10 Below Ice Cream, Olivia shares single-serving recipes that are fresh, plant-forward, and full of heart. She loves helping people eat better, without stress, strict rules, or sacrificing flavor.
Beyond the kitchen, Olivia spends her time tending her backyard garden, practicing yoga, and discovering hidden gems in Portland’s food scene.