Dreamy Mint Aero Drip Cake Recipe: A Sweet Adventure
Crafting a mint aero drip cake brings pure indulgence to chocolate lovers seeking an extraordinary dessert experience.
Sweet layers of rich chocolate sponge create a mesmerizing foundation for this decadent treat.
Creamy mint buttercream weaves through each delicate layer, promising delightful bursts of refreshing flavor.
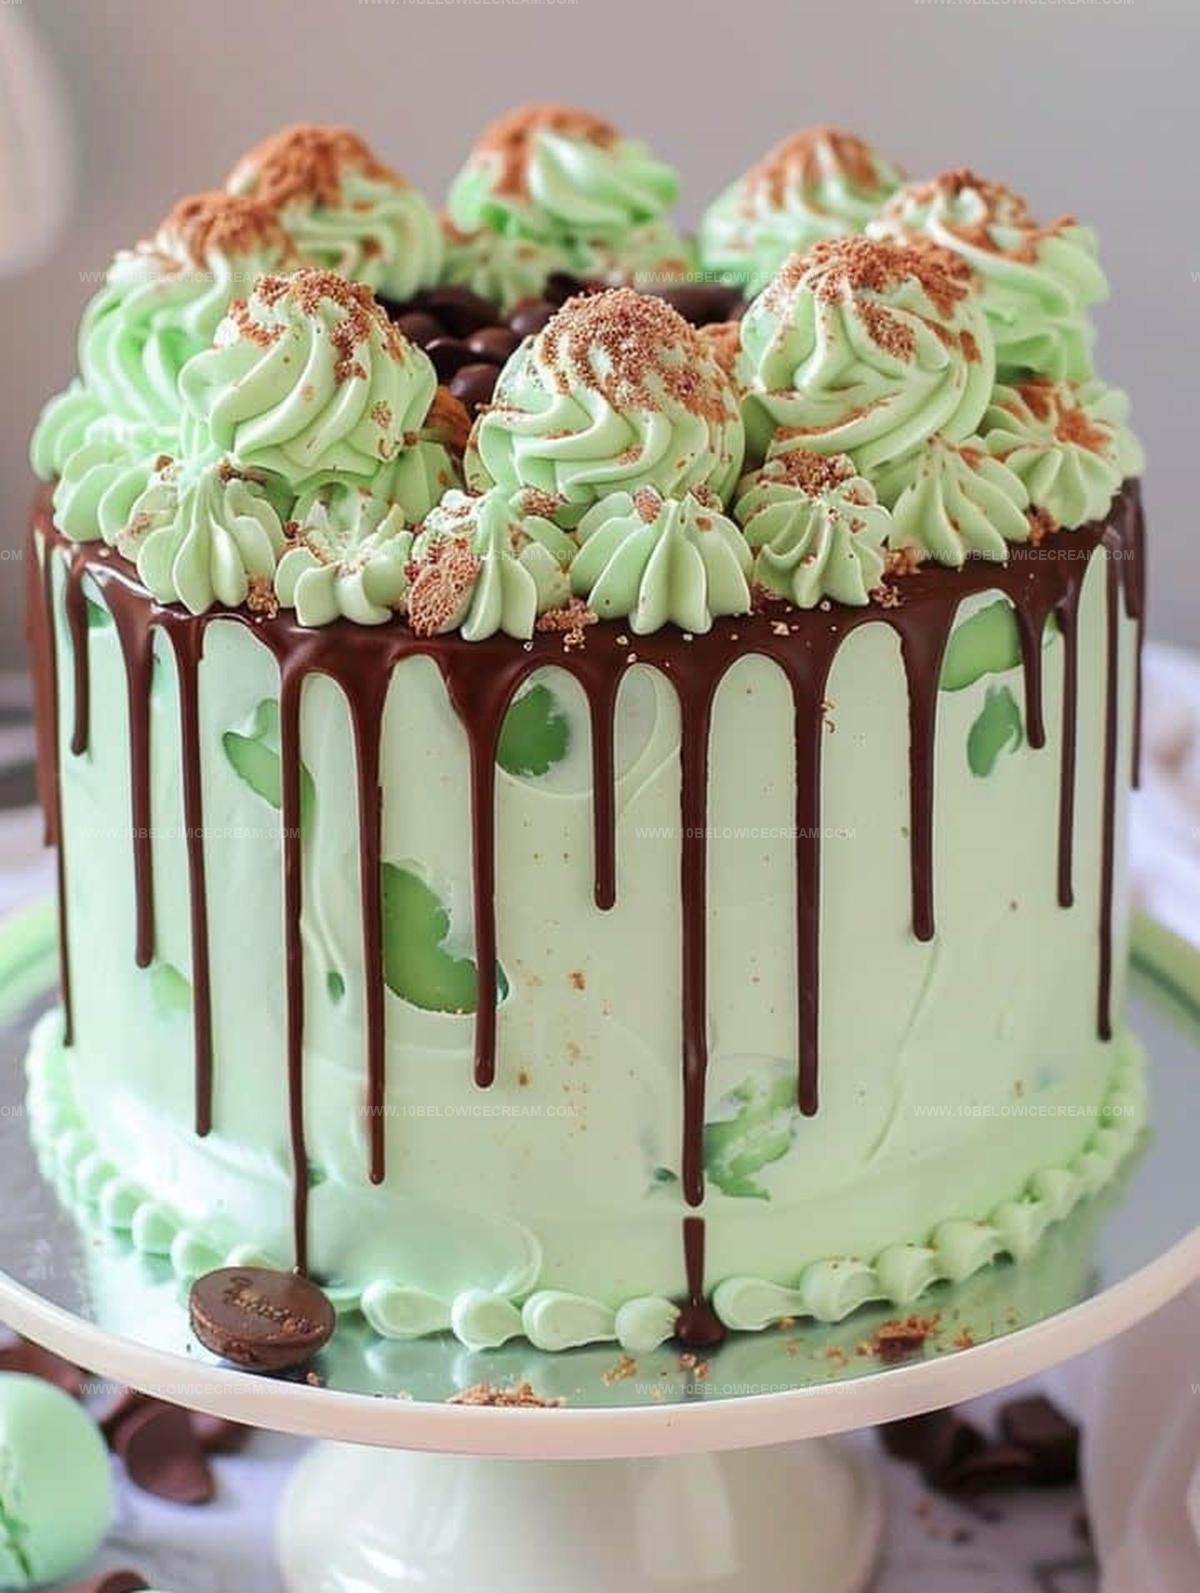
Delicate chocolate ganache cascades artfully down the cake’s sides, creating an Instagram-worthy presentation that will impress everyone.
Airy and light, this cake combines classic mint chocolate charm with modern baking techniques.
Chocolate enthusiasts will find themselves captivated by the intricate balance of cool mint and deep cocoa notes.
Prepare to dazzle and delight with this showstopping mint aero drip cake that transforms an ordinary moment into something magical.
Pro Tips to Elevate Mint Aero Drip Cake Baking
Creative Ways to Change Up Mint Aero Drip Cake
Perfect Pairings to Complement Mint Aero Drip Cake
Best Practices for Storing Mint Aero Drip Cake
Frequently Asked Questions on Mint Aero Drip Cake
The mint extract added to both the cake batter and buttercream creates a refreshing mint taste throughout the entire dessert.
Yes, you can skip the green food coloring and the cake will still taste delicious, though it won’t have the same vibrant green color.
Ensure your chocolate is finely chopped and the cream is at the right temperature. Let the ganache cool slightly before pouring to achieve the perfect drip consistency.
Absolutely! The combination of mint buttercream, mint extract, and Mint Aero chocolate bars makes this cake a dream for anyone who loves mint chocolate flavor.
Mint Aero Drip Cake: What Makes It Special
Key Ingredients to Whip Up Mint Aero Drip Cake
Cake Base Ingredients:Flavor Enhancers:Leavening and Seasoning:Buttercream Ingredients:Ganache and Decoration Ingredients:Stepwise Directions for Mint Aero Drip Cake Success
Step 1: Prep The Baking Space
Warm up the oven to 350F. Grab three 8-inch round cake pans and coat them with butter and flour to prevent sticking.
Step 2: Mix Dry Ingredients
Combine flour, baking powder, and salt in a bowl. Whisk them together until well blended.
Step 3: Create Cake Base
In a large mixing bowl, cream butter and sugar until they transform into a light, fluffy mixture. Crack eggs one by one, mixing thoroughly after each addition. Splash in vanilla and mint extracts for that delightful flavor.
Step 4: Blend Batter
Slowly fold the flour mixture into the butter blend, alternating with milk. Start and end with flour. Add green food coloring until you achieve a beautiful mint-like shade.
Step 5: Bake Cake Layers
Evenly distribute batter across prepared pans. Slide into the oven and bake for 25-30 minutes. Check doneness by inserting a toothpick – it should come out clean. Let cakes rest in pans for 10 minutes, then transfer to cooling racks.
Step 6: Whip Up Mint Buttercream
Beat butter until smooth and creamy. Gradually incorporate powdered sugar, creating a silky texture. Add heavy cream, mint extract, and green food coloring. Whip until light and airy.
Step 7: Craft Chocolate Ganache
Heat heavy cream in a saucepan until it just starts to simmer. Pour over chopped chocolate and let sit for 5 minutes. Stir until completely smooth, then mix in butter for a glossy finish.
Step 8: Stack And Frost Cake
Place first cake layer on serving plate. Spread a generous layer of mint buttercream. Repeat with remaining layers. Cover entire cake with buttercream, creating a smooth surface.
Step 9: Create Drip Effect
Gently pour ganache over cake top, allowing it to elegantly cascade down the sides. Garnish with chopped Mint Aero chocolate bars and fresh mint leaves for a stunning presentation.
Print
Mint Aero Drip Cake Recipe
- Total Time: 55-60 minutes
- Yield: 12 1x
Description
Sweet chocolate dreams meet Irish charm in this Mint Aero Drip Cake, cascading with rich layers of indulgence. Cool mint and chocolate merge into a delectable celebration that promises pure dessert bliss for chocolate enthusiasts.
Ingredients
Cake Ingredients:
- 2 1/2 cups (310 grams) all-purpose flour
- 2 1/2 teaspoons baking powder
- 1/2 teaspoon salt
- 1 cup (227 grams) unsalted butter, softened
- 1 1/2 cups (300 grams) granulated sugar
- 4 large eggs
- 1 cup (240 milliliters) whole milk
Flavoring Ingredients:
- 1 teaspoon vanilla extract
- 1 teaspoon mint extract
- Green food coloring
Decorative/Topping Ingredients:
- Mint Aero chocolate bars (for decoration)
Instructions
- Prepare the oven at 350F (175C) and prepare three 8-inch round cake pans with grease and flour.
- Combine flour, baking powder, and salt in a medium mixing bowl, setting the dry mixture aside.
- Cream butter and sugar until achieving a light, airy texture. Incorporate eggs individually, ensuring thorough mixing after each addition. Blend vanilla and mint extracts into the mixture.
- Gradually fold flour mixture into the butter base, alternating with milk. Introduce green food coloring to create the desired mint-like hue.
- Distribute batter evenly across prepared pans. Bake for 25-30 minutes until a testing skewer emerges clean. Allow cakes to rest in pans for 10 minutes, then transfer to cooling racks.
- Whip butter until smooth and creamy. Incrementally add powdered sugar, creating a silky consistency. Incorporate heavy cream, mint extract, and green food coloring, beating until achieving a light, fluffy texture.
- Heat heavy cream until it reaches a gentle simmer. Pour over chocolate pieces and let sit for 5 minutes. Stir until achieving a glossy, uniform consistency, then blend in butter.
- Position first cake layer on serving plate. Spread mint buttercream across the surface. Layer remaining cake rounds, repeating buttercream application between each.
- Generously coat entire cake with buttercream, creating a smooth finish. Drizzle ganache over the top, allowing elegant drips to cascade down the sides. Garnish with chopped Mint Aero chocolate bars and fresh mint leaves for visual appeal.
Notes
- Swap mint extract with peppermint for a stronger, more intense flavor profile that elevates the cake’s minty essence.
- Use gel food coloring instead of liquid for more vibrant green color without thinning the batter’s consistency.
- Freeze cake layers for 30 minutes before frosting to prevent crumbs from mixing into buttercream and create cleaner decoration lines.
- Crush Mint Aero bars partially before decorating to add textural contrast and intense mint chocolate crunch to each slice.
- Prep Time: 30 minutes
- Cook Time: 25-30 minutes
- Category: Desserts
- Method: Baking
- Cuisine: British
Nutrition
- Serving Size: 12
- Calories: 360
- Sugar: 31 g
- Sodium: 160 mg
- Fat: 18 g
- Saturated Fat: 11 g
- Unsaturated Fat: 7 g
- Trans Fat: 0.5 g
- Carbohydrates: 44 g
- Fiber: 1 g
- Protein: 5 g
- Cholesterol: 85 mg
Olivia Brooks
Contributing Writer
Expertise
Education
Culinary Institute of America
Accelerated Culinary Arts Certificate Program
Focus: Culinary fundamentals, nutrition, and healthy cooking technique
Olivia believes good food should feed both the body and the soul. She earned her Accelerated Culinary Arts Certificate from the Culinary Institute of America, where she focused on nutrition and practical cooking techniques that make healthy eating easy.
At 10 Below Ice Cream, Olivia shares single-serving recipes that are fresh, plant-forward, and full of heart. She loves helping people eat better, without stress, strict rules, or sacrificing flavor.
Beyond the kitchen, Olivia spends her time tending her backyard garden, practicing yoga, and discovering hidden gems in Portland’s food scene.