
Rustic Homemade Pierogi Recipe: Cozy Comfort in Every Bite
Crafting delectable homemade pierogi brings pure comfort to any kitchen adventure.
Polish cuisine offers incredible culinary magic with these soft, pillowy dumplings.
Stuffed with creamy potatoes, tangy cheese, or savory meats, each pierogi tells a delicious story.
Generations of cooks have perfected these delightful pockets of happiness.
My grandmother’s secret techniques blend traditional methods with modern twists.
Small hands working dough create memories as rich as the fillings themselves.
You’ll fall in love with this simple yet spectacular dish that connects culture and flavor in every single bite.
What’s So Special About Homemade Pierogi? Here’s the Magic
Let’s Talk Dough and Fillings: Pierogi Ingredient Guide
For the Dough:For the Filling:For the Finishing and Serving:Making Pierogi From Scratch – Easier Than You Think

Step 1: Create Dough Base
Whisk flour and salt together in a spacious mixing bowl. Make a small crater in the center where you’ll add egg and water. Blend ingredients until a soft, pliable mixture forms.
Step 2: Knead and Develop Texture
Work the dough with your hands, pushing and folding consistently. Continue kneading for 5-7 minutes until the texture becomes smooth and slightly bouncy. The dough should feel elastic and cohesive.
Step 3: Allow Dough to Rest
Cover the dough completely with a clean kitchen towel. Let it sit quietly at room temperature for half an hour, allowing gluten strands to relax and develop deeper flavor complexity.
Step 4: Prepare Delicious Filling
Combine filling ingredients in a separate bowl:Mix thoroughly until ingredients blend into a creamy, savory mixture.
Step 5: Roll and Shape Dough
Sprinkle flour lightly on work surface. Roll dough until reaching approximately 1/8-inch thickness. Ensure even, thin coverage across entire surface.
Step 6: Cut Dough Circles
Use a round cookie cutter or drinking glass to create uniform dough circles. Aim for circles around 3 inches wide.
Step 7: Add Filling
Place a small spoonful of potato-cheese mixture directly in the center of each dough circle. Be careful not to overstuff.
Step 8: Seal Pierogi
Fold dough over filling, creating a half-moon shape. Pinch and crimp edges firmly to ensure complete sealing.
Step 9: Boil Pierogi
Fill a large pot with salted water. Bring to a gentle boil. Drop pierogi in batches. Cook 3-4 minutes until they float upward.
Step 10: Drain Cooked Pierogi
Remove boiled pierogi using a slotted spoon. Allow excess water to drain completely.
Step 11: Create Crispy Exterior
Melt butter in a large skillet over medium heat. Gently pan-fry pierogi until achieving a golden, crispy exterior. Cook 2-3 minutes per side.
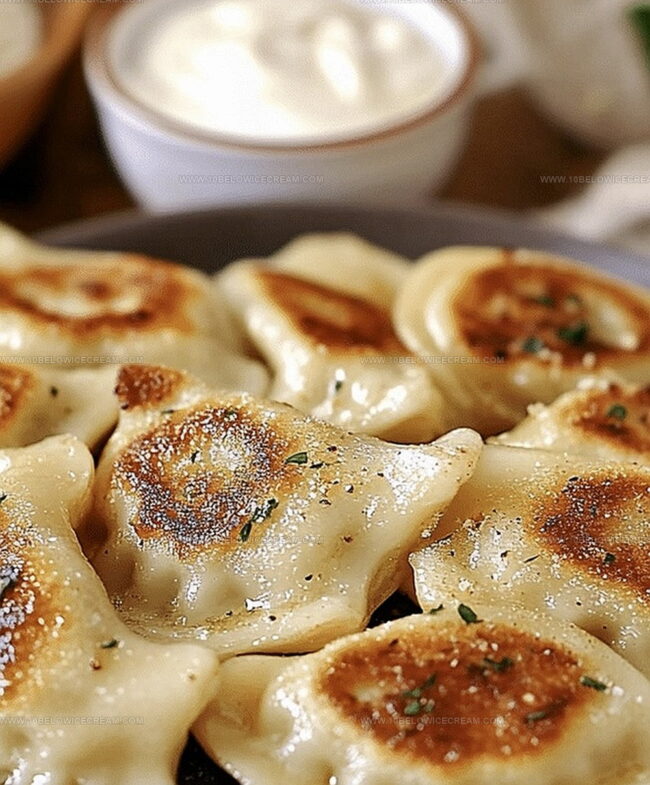
Step 12: Serve and Garnish
Transfer crispy pierogi to serving plates. Sprinkle chopped chives on top. Serve immediately with a generous dollop of sour cream.
Pierogi Like a Pro – Handy Secrets You’ll Love
Stuff, Seal, Sizzle: Creative Pierogi Variations
What to Serve Alongside Those Cozy Homemade Pierogi
Leftover Pierogi? Here’s How to Keep Them Fresh
Pierogi Puzzles Solved: Top Questions Answered
Pierogi are traditional Eastern European dumplings made of unleavened dough filled with various ingredients like potatoes, cheese, meat, or fruit, then boiled and often pan-fried.
Pierogi require some practice but are manageable for home cooks. The key is maintaining consistent dough thickness and properly sealing the edges to prevent filling from leaking.
Yes, you can prepare pierogi dough in advance. Wrap it tightly in plastic wrap and refrigerate for up to 2 days. Let it come to room temperature before rolling and filling.
Print
Homemade Pierogi Recipe
- Total Time: 50 minutes
- Yield: 4 1x
Description
Polish pierogi delight hungry souls with authentic comfort wrapped in delicate dough pockets. Savory fillings and golden-brown edges promise a culinary journey through traditional Eastern European kitchens that you will cherish.
Ingredients
Dough:
- 2 cups all-purpose flour
- 1/2 tsp salt
- 1 large egg
- 1/2 cup water
Filling:
- 2 cups mashed potatoes
- 1 cup shredded cheddar cheese
- 1/2 cup diced onions
- 1/4 tsp black pepper
Garnish and Cooking:
- 4 tbsp unsalted butter
- 1/4 cup chopped fresh chives
- 2 tbsp sour cream (for serving)
- Salt to taste
Instructions
- Prepare the dough by combining flour and salt in a large mixing bowl, creating a well in the center for the egg and water.
- Knead the mixture into a smooth, elastic dough, working it for about 5-7 minutes until it becomes cohesive and slightly springy.
- Cover the dough with a clean kitchen towel and let it rest at room temperature for 30 minutes, allowing the gluten to relax.
- While the dough rests, mix mashed potatoes, shredded cheddar cheese, diced onions, and black pepper in a separate bowl to create a creamy, flavorful filling.
- Roll out the rested dough on a lightly floured surface to approximately 1/8-inch thickness, ensuring an even, thin layer.
- Use a round cookie cutter or glass to cut uniform circles from the rolled-out dough, typically about 3 inches in diameter.
- Place a small spoonful of potato-cheese filling in the center of each dough circle, being careful not to overfill.
- Fold the dough over the filling to create a half-moon shape, pinching and crimping the edges tightly to seal the pierogi completely.
- Bring a large pot of salted water to a gentle boil, then carefully drop the pierogi in batches, cooking for 3-4 minutes until they float to the surface.
- Remove the boiled pierogi with a slotted spoon and drain excess water.
- Melt butter in a large skillet over medium heat, then gently pan-fry the boiled pierogi until golden and crispy on both sides, about 2-3 minutes per side.
- Transfer the crispy pierogi to a serving plate, garnish with chopped chives, and serve immediately with a dollop of sour cream.
Notes
- Flour Selection Matters: Choose high-protein bread flour for a more elastic, sturdy dough that holds filling beautifully without tearing during boiling.
- Dough Resting Technique: Let the dough rest covered at room temperature to allow gluten to relax, ensuring easier rolling and preventing tough, chewy pierogi.
- Filling Consistency Control: Keep potato-cheese mixture thick and not watery to prevent leakage during cooking, using well-drained mashed potatoes.
- Freezer-Friendly Option: Uncooked pierogi can be frozen on a baking sheet, then transferred to freezer bags for quick future meals, maintaining their delicate texture.
- Prep Time: 30 minutes
- Cook Time: 15-20 minutes
- Category: Lunch, Dinner, Appetizer, Snacks
- Method: Boiling
- Cuisine: Polish
Nutrition
- Serving Size: 4
- Calories: 360
- Sugar: 1 g
- Sodium: 300 mg
- Fat: 14 g
- Saturated Fat: 8 g
- Unsaturated Fat: 4 g
- Trans Fat: 0 g
- Carbohydrates: 45 g
- Fiber: 2 g
- Protein: 10 g
- Cholesterol: 60 mg
Jackson Reid
Founder & Recipe Developer
Expertise
Education
Holyoke Community College – HCC-MGM Culinary Arts Institute
Certificate in Culinary Arts
Focus: Farm-to-table cuisine, sustainable cooking practices, and hands-on kitchen training
Jackson’s love for cooking began one dish at a time. After earning his Culinary Arts Certificate from Holyoke Community College’s HCC-MGM Culinary Arts Institute, he focused on what mattered most: creating recipes that are simple to follow and full of flavor.
At 10 Below Ice Cream, Jackson brings together global influences and a less-is-more approach. His recipes reflect his belief that good food doesn’t need to be complicated; it just needs to make sense, taste great, and feel right.
When he’s not testing ingredients or adjusting seasonings, you’ll find him hiking near Asheville, exploring local markets, or chasing the best light for food photos.