Crispy Ham and Cheese Sticks Recipe to Snack On
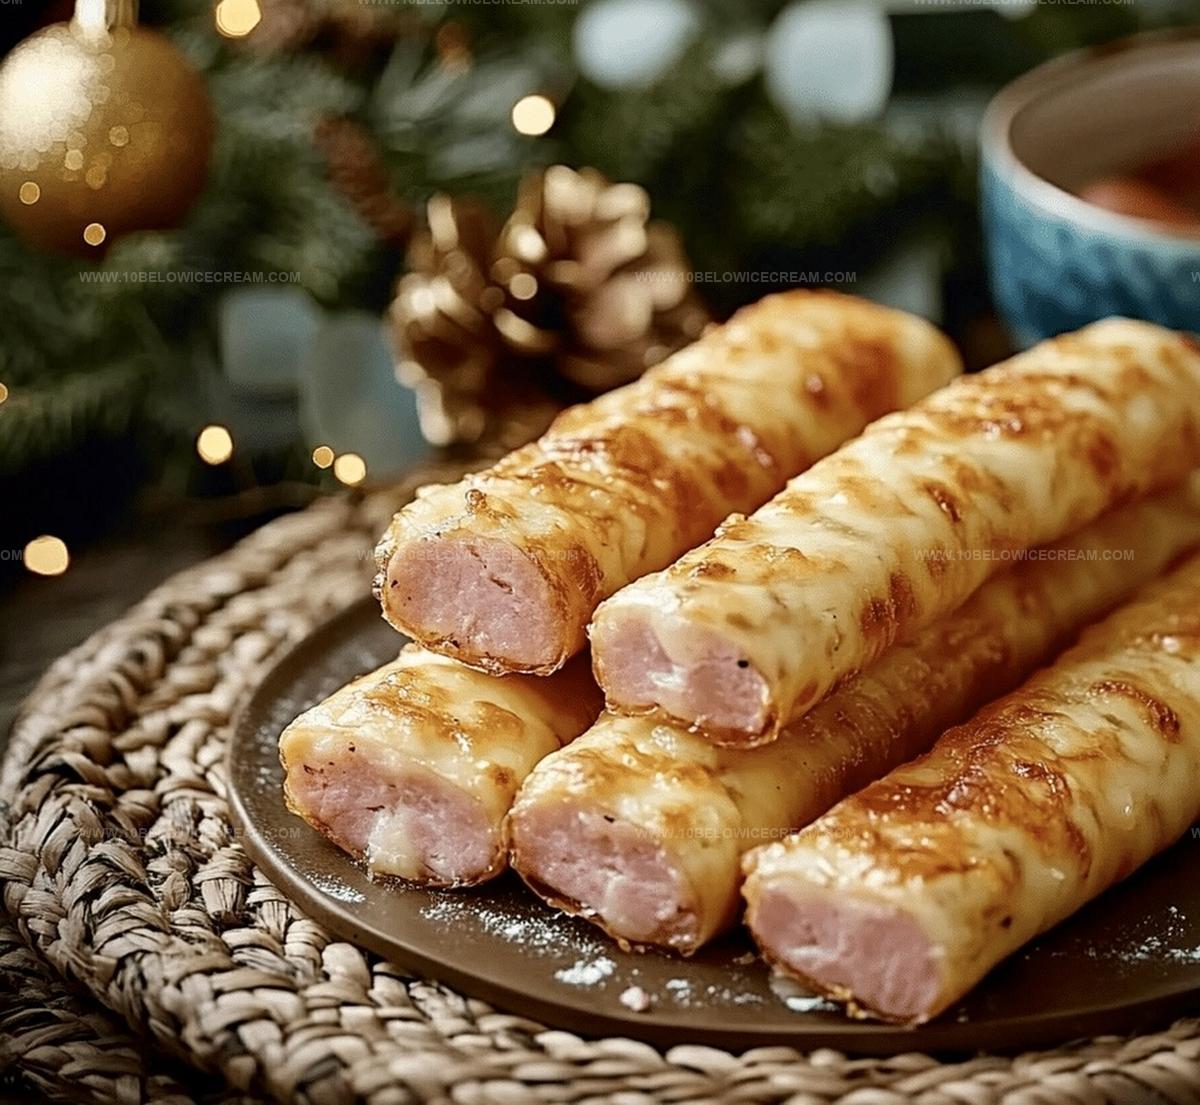
Crispy ham and cheese sticks bring comfort right to your plate with a golden, crunchy exterior that promises delightful flavor.
Cheesy goodness melts inside a perfectly seasoned coating of breadcrumbs.
Savory ham adds depth to each delectable bite.
Homemade snacks like these make simple ingredients shine with minimal effort.
Quick preparation means you can whip up these appetizers in minutes.
Perfect for game nights or casual gatherings, these sticks will have everyone reaching for seconds.
Dive into this easy recipe and watch smiles spread around the table.
What Makes Ham And Cheese Sticks A Favorite

What You Need For Ham And Cheese Sticks
For the Base Ingredients:For the Seasoning Ingredients:For the Filling and Topping Ingredients:How To Make Ham And Cheese Sticks

Step 1: Warm Up The Oven
Crank the oven to 375°F and line a baking sheet with parchment paper. This prepares a perfect cooking surface for your delicious snacks.
Step 2: Mix Dry Ingredients
Grab a large mixing bowl and combine:Whisk these together to create a flavorful base for your dough.
Step 3: Blend Wet Ingredients
In a separate bowl, whisk together:Blend until the mixture looks smooth and fully combined.
Step 4: Create Dough
Pour the wet ingredients into the dry ingredients. Stir gently until a soft dough forms. Don’t overmix – you want the dough to be just combined.
Step 5: Add Tasty Fillings
Fold in:Distribute these throughout the dough evenly.
Step 6: Roll Out The Dough
Sprinkle flour on a clean surface. Roll the dough out to about 1/4-inch thickness.
Step 7: Cut Into Strips
Slice the dough into rectangular strips, each about 3 inches long and 1 inch wide.
Step 8: Prepare For Baking
Place the strips on the prepared baking sheet. Leave small spaces between each piece.
Step 9: Add Final Touches
Lightly brush the tops with olive oil. Sprinkle breadcrumbs over the surface for extra crunch.
Step 10: Bake To Perfection
Slide the baking sheet into the oven. Bake for 18-22 minutes until the edges turn golden and cheese bubbles.
Step 11: Cool Down
Remove from the oven. Let the sticks rest on the baking sheet for 5 minutes.
Step 12: Serve And Enjoy
Transfer to a serving platter. Grab while warm and crispy for maximum deliciousness!
Handy Tips For Ham And Cheese Sticks
Creative Takes On Ham And Cheese Sticks
What Goes Well With Ham And Cheese Sticks
How To Keep Ham And Cheese Sticks Fresh
Ham And Cheese Sticks Questions Answered
No, these sticks contain ham and cheese, making them non-vegetarian. They are perfect for meat and dairy lovers.
Yes, you can prepare the dough in advance and refrigerate it for up to 24 hours before baking. Just wrap it tightly in plastic wrap to prevent drying.
Cheddar cheese is recommended for its sharp flavor and excellent melting properties, but you can also use mozzarella or Swiss cheese for variation.
No special equipment is required. A mixing bowl, baking sheet, parchment paper, and basic kitchen tools are all you need to create these delicious sticks.
Print
Ham And Cheese Sticks Recipe
- Total Time: 42 minutes
- Yield: 8 1x
Description
Crispy ham and cheese sticks bring classic comfort to your appetizer spread, delivering golden-brown crunch with savory warmth. Melted cheese and salty ham wrapped in a perfectly seasoned coating invite hungry guests to indulge in this irresistible finger food.
Ingredients
Main Ingredients:
- 2 cups ham, diced
- 1.5 cups shredded cheddar cheese
- 2 cups all-purpose flour
Dough/Coating Ingredients:
- 2 large eggs
- 1/2 cup milk
- 1/4 cup butter, melted
- 1 tsp salt
- 1/2 tsp black pepper
Seasoning/Optional Ingredients:
- 1 tsp dried parsley
- 1/2 tsp garlic powder
- 1/4 cup breadcrumbs
- 2 tbsp olive oil (for brushing)
Instructions
- Preheat the oven to 375°F and line a baking sheet with parchment paper, ensuring an even surface for crispy ham and cheese sticks.
- In a large mixing bowl, combine flour, salt, black pepper, dried parsley, and garlic powder, creating a well-seasoned base for the dough.
- Whisk eggs, milk, and melted butter in a separate bowl until smooth and thoroughly integrated, forming a rich liquid mixture.
- Gradually pour the liquid ingredients into the flour mixture, stirring until a soft, cohesive dough forms without overmixing.
- Fold diced ham and shredded cheddar cheese into the dough, distributing ingredients evenly throughout the mixture.
- Dust a clean work surface with flour and roll out the dough to approximately 1/4-inch thickness.
- Cut the dough into uniform rectangular strips, roughly 3 inches long and 1 inch wide.
- Arrange the ham and cheese sticks on the prepared baking sheet, leaving small gaps between each piece for even heating.
- Lightly brush the tops of the sticks with olive oil and sprinkle breadcrumbs over the surface for added crunch.
- Bake in the preheated oven for 18-22 minutes, or until the edges turn golden brown and the cheese begins to bubble.
- Remove from the oven and let the ham and cheese sticks cool on the baking sheet for 5 minutes before serving.
- Transfer to a serving platter and enjoy while warm and crispy.
Notes
- Swap ingredients to create gluten-free versions by using almond or coconut flour for traditional wheat flour.
- Enhance flavor complexity by adding a pinch of smoked paprika or cayenne pepper into the dry ingredient mixture for subtle heat.
- Experiment with different cheese varieties like gruyère, monterey jack, or pepper jack to create unique taste profiles and texture variations.
- Store leftover sticks in an airtight container and reheat in the oven at 350°F for 5-7 minutes to maintain crispiness and prevent sogginess.
- Prep Time: 20 minutes
- Cook Time: 22 minutes
- Category: Snacks, Appetizer
- Method: Baking
- Cuisine: American
Nutrition
- Serving Size: 8
- Calories: 290
- Sugar: 1 g
- Sodium: 620 mg
- Fat: 16 g
- Saturated Fat: 8 g
- Unsaturated Fat: 7 g
- Trans Fat: 0 g
- Carbohydrates: 24 g
- Fiber: 1 g
- Protein: 12 g
- Cholesterol: 70 mg
Olivia Brooks
Contributing Writer
Expertise
Education
Culinary Institute of America
Accelerated Culinary Arts Certificate Program
Focus: Culinary fundamentals, nutrition, and healthy cooking technique
Olivia believes good food should feed both the body and the soul. She earned her Accelerated Culinary Arts Certificate from the Culinary Institute of America, where she focused on nutrition and practical cooking techniques that make healthy eating easy.
At 10 Below Ice Cream, Olivia shares single-serving recipes that are fresh, plant-forward, and full of heart. She loves helping people eat better, without stress, strict rules, or sacrificing flavor.
Beyond the kitchen, Olivia spends her time tending her backyard garden, practicing yoga, and discovering hidden gems in Portland’s food scene.