
The Perfect Egg Custard Tart Recipe: Silky, Sweet Comfort
Crafting a delectable egg custard tart brings pure culinary magic to your kitchen.
Whispers of nostalgia dance through traditional Portuguese and British pastry techniques.
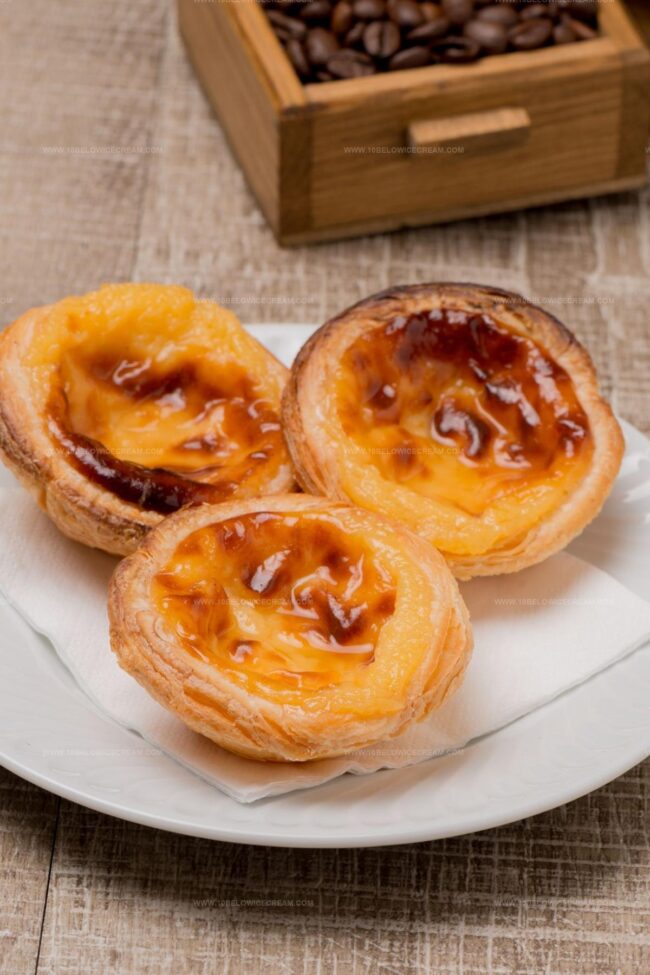
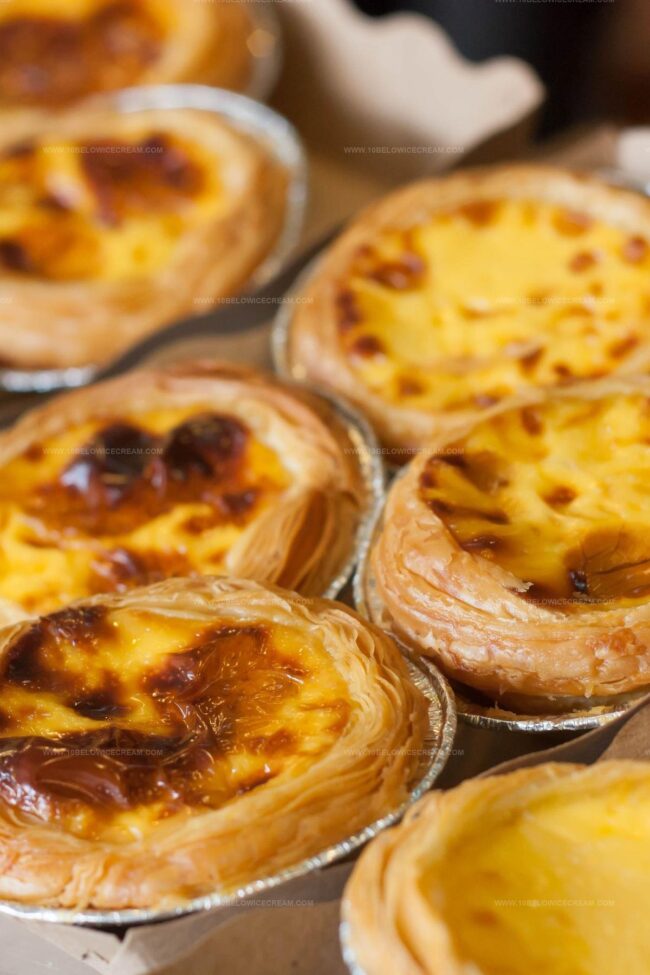
Silky smooth custard nestles inside a buttery, crisp pastry shell that melts perfectly on your tongue.
Delicate flavors promise a dessert both comforting and elegant.
Subtle hints of nutmeg and vanilla weave through each creamy bite.
Simple ingredients combine to create something extraordinary.
One slice will transport you to elegant afternoon tea moments.
How To Store Mary Berry Egg Custard Tart The Right Way
FAQs On Mary Berry Egg Custard Tart
Laminating the oil and water doughs by folding and rolling creates multiple thin layers that result in a delicate, crisp texture.
Yes, you can prepare the dough and tart shells a day in advance and refrigerate until ready to fill and bake.
A basic rolling pin, tart molds, and standard baking tools are sufficient. No specialized equipment is required.
It’s moderate difficulty, requiring some pastry technique like laminating dough and making custard, but very achievable for someone with basic baking skills.
Why Mary Berry Egg Custard Tart Is A Classic
What You Need For Mary Berry Egg Custard Tart
Dough Base:Custard Filling:Finishing Ingredients:How To Bake Mary Berry Egg Custard Tart Easily
Step 1: Craft Oil Dough
Whip up a smooth oil dough by blending flour with shortening or butter. Work the mixture until it forms a cohesive, pliable dough. Wrap it carefully and tuck into the refrigerator to rest and chill.
Step 2: Create Water Dough
Mix flour with water and a touch of salt to form a silky water dough. Knead gently until the texture becomes uniform and elastic. Cover and refrigerate alongside the oil dough.
Step 3: Merge Doughs Through Lamination
Place the chilled oil dough inside the water dough. Roll out the combined dough carefully, creating delicate layers. Fold and roll repeatedly to develop flaky, buttery pastry texture.
Step 4: Shape Elegant Tart Shells
Stretch the laminated dough and press into tart molds. Trim edges neatly and return shells to the refrigerator to firm up. The cold helps maintain the intricate layers.
Step 5: Whip Luxurious Custard Filling
Blend ingredients for the custard:Whisk until smooth and silky, ensuring no lumps remain.
Step 6: Bake Golden Tart Masterpiece
Pour custard into prepared shells. Slide into a preheated oven. Bake until the filling sets and the edges turn golden brown. The aroma will fill your kitchen with anticipation.
Step 7: Cool and Serve
Allow tarts to cool completely. Gently remove from molds. Dust with powdered sugar if desired. Enjoy your delicate, homemade egg custard tarts!
Helpful Tips For Mary Berry Egg Custard Tart
Fun Options For Mary Berry Egg Custard Tart
What Goes Well With Mary Berry Egg Custard Tart
Print
Egg Custard Tart Recipe
- Total Time: 1 hour 45 minutes
- Yield: 6 1x
Description
Silky smooth egg custard tart whispers classic British dessert comfort with its golden, creamy filling nestled in a buttery shortcrust pastry. Sweet nostalgia and delicate flavors invite you to savor each delightful, traditional bite.
Ingredients
Main Ingredients:
- 4 large eggs
- 1 large egg
- 1 1/2 cups all-purpose flour
- 1/2 cup sugar
Dairy and Liquid Ingredients:
- 1 1/2 sticks (12 tablespoons) cold unsalted butter
- 1/4 cup evaporated milk
- 2 tablespoons water
- 1 cup water
Seasoning and Additional Ingredients:
- 1/2 teaspoon pure vanilla extract
- Pinch of salt
Instructions
- Prepare two distinct dough types – oil-based and water-based – and refrigerate them separately to enhance texture and manageability.
- Create a layered pastry by meticulously folding and rolling the two doughs together, generating delicate, flaky pastry sheets.
- Carefully mold the laminated dough into tart shells, ensuring uniform thickness and smooth edges, then return to refrigerator for firming.
- Craft a silky sugar syrup by gently heating and dissolving sugar, simultaneously preparing a rich, smooth custard mixture with precise whisking.
- Pour the luxurious custard into the chilled tart shells, ensuring even distribution and minimal air bubbles.
- Position the filled tart shells in a preheated oven at 350°F, allowing them to bake for approximately 45 minutes until the custard sets and the pastry turns golden brown.
- Remove from oven and let the tarts cool completely at room temperature, which helps the custard stabilize and develop a perfect consistency.
- Gently unmold the tarts, revealing the delicate, flaky exterior and creamy interior, ready to be served and savored.
Notes
- Chill doughs thoroughly to ensure flaky, tender pastry layers that melt in your mouth.
- Use cold ingredients when making oil and water doughs to prevent gluten development and maintain a delicate texture.
- Laminate dough carefully by creating multiple thin layers, which helps achieve that signature crispy, buttery crust.
- Strain custard mixture through a fine-mesh sieve to remove any lumps, guaranteeing a silky smooth filling.
- For a gluten-free version, substitute regular flour with a high-quality gluten-free blend that contains xanthan gum.
- Allow tart to cool completely before slicing to help custard set properly and prevent structural collapse.
- Prep Time: 1 hour (including chilling and preparation steps)
- Cook Time: 45 minutes
- Category: Desserts
- Method: Baking
- Cuisine: Portuguese
Nutrition
- Serving Size: 6
- Calories: 290 kcal
- Sugar: 14 g
- Sodium: 70 mg
- Fat: 18 g
- Saturated Fat: 10 g
- Unsaturated Fat: 6 g
- Trans Fat: 0.5 g
- Carbohydrates: 22 g
- Fiber: 1 g
- Protein: 6 g
- Cholesterol: 125 mg
Jackson Reid
Founder & Recipe Developer
Expertise
Education
Holyoke Community College – HCC-MGM Culinary Arts Institute
Certificate in Culinary Arts
Focus: Farm-to-table cuisine, sustainable cooking practices, and hands-on kitchen training
Jackson’s love for cooking began one dish at a time. After earning his Culinary Arts Certificate from Holyoke Community College’s HCC-MGM Culinary Arts Institute, he focused on what mattered most: creating recipes that are simple to follow and full of flavor.
At 10 Below Ice Cream, Jackson brings together global influences and a less-is-more approach. His recipes reflect his belief that good food doesn’t need to be complicated; it just needs to make sense, taste great, and feel right.
When he’s not testing ingredients or adjusting seasonings, you’ll find him hiking near Asheville, exploring local markets, or chasing the best light for food photos.