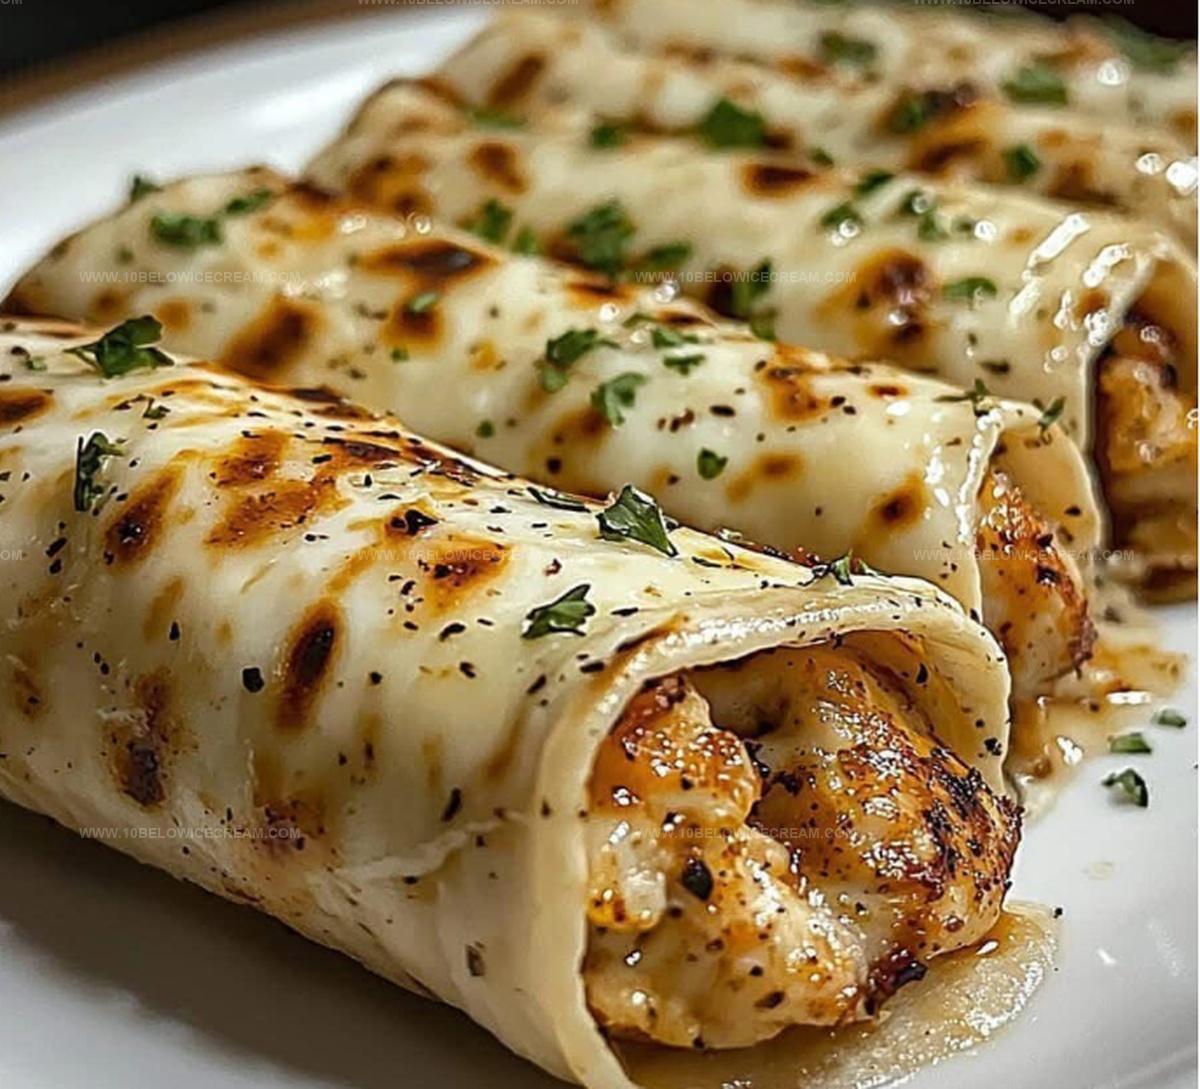
Irresistible Easy Cheesy Garlic Chicken Wraps Recipe for Lunch
Crispy and delightful easy cheesy garlic chicken wraps promise a mouthwatering meal that’ll make your taste buds dance.
Packed with bold flavors, these wraps combine tender chicken and melted cheese in a perfect handheld package.
Garlic adds a zesty punch that elevates every single bite.
Weeknight dinners become extraordinary with this simple yet impressive recipe.
Quick to assemble and even faster to devour, these wraps offer a delicious solution for hungry crowds.
Creamy cheese and succulent chicken nestled in a warm tortilla create a combo you won’t be able to resist.
You’ll want to bookmark this recipe and make it part of your regular rotation.
What You’ll Need For Easy Cheesy Garlic Chicken Wraps
For the Proteins:For the Seasonings:For the Wrap Components:For the Cooking Components:Easy Steps To Make Easy Cheesy Garlic Chicken Wraps
Step 1: Prepare Oven and Baking Surface
Crank up the oven to 375°F and line a baking sheet with parchment paper for hassle-free cooking and easy cleanup.
Step 2: Prep Garlic
Chop garlic cloves into super fine pieces to create an aromatic flavor base that will make your chicken sing with deliciousness.
Step 3: Dry Chicken
Use paper towels to completely dry chicken breasts, ensuring seasonings stick perfectly and creating amazing browning potential.
Step 4: Season Chicken
Generously coat chicken with:Massage spices deeply into the meat for maximum flavor explosion.
Step 5: Sear Chicken
Heat olive oil in a large skillet over medium-high heat and sear chicken breasts 3-4 minutes per side until they develop a gorgeous golden-brown crust.
Step 6: Slice Chicken
Transfer chicken to a cutting board and slice into thin, even strips that will distribute beautifully throughout the wraps.
Step 7: Warm Tortillas
Quickly warm flour tortillas in the microwave or skillet to make them super flexible and prevent annoying cracking.
Step 8: Add Cheese Layer
Sprinkle a luxurious blend of:across each tortilla, creating a molten cheese foundation.
Step 9: Add Chicken
Distribute sliced chicken evenly over cheesy tortillas to guarantee perfect flavor in every single bite.
Step 10: Crunch It Up
Scatter breadcrumbs over chicken to introduce an irresistible crispy texture inside the wrap.
Step 11: Roll Wraps
Carefully roll tortillas into tight bundles, tucking sides to lock in all that delicious filling.
Step 12: Position Wraps
Place wrapped chicken rolls seam-side down on the baking sheet to maintain their beautiful shape.
Step 13: Bake to Perfection
Bake in the preheated oven for 15-18 minutes until cheese transforms into a gooey paradise and tortilla edges turn beautifully golden and crisp.
Step 14: Rest and Serve
Pull wraps from the oven and let them rest 2-3 minutes, allowing cheese to set and cool slightly before diving in.
Pro Tips For Easy Cheesy Garlic Chicken Wraps
Tasty Variations Of Easy Cheesy Garlic Chicken Wraps
What To Serve With Easy Cheesy Garlic Chicken Wraps
How To Store Easy Cheesy Garlic Chicken Wraps
FAQs For Easy Cheesy Garlic Chicken Wraps
Boneless, skinless chicken breasts are ideal because they cook evenly, absorb seasonings well, and provide lean protein for the wraps.
Yes, you can substitute mozzarella and cheddar with alternatives like pepper jack, provolone, or monterey jack for varied flavor profiles.
Pat the chicken dry before seasoning, use fresh tortillas, and avoid adding watery ingredients that might create moisture inside the wrap.
Absolutely! You can prepare these wraps ahead of time, wrap them individually in foil, and refrigerate or freeze for convenient future meals.
Why Easy Cheesy Garlic Chicken Wraps Are So Satisfying
Print
Easy Cheesy Garlic Chicken Wraps Recipe
- Total Time: 35-40 minutes
- Yield: 4 1x
Description
Savory easy cheesy garlic chicken wraps deliver a delightful meal packed with flavor and comfort. Crisp tortillas embrace tender chicken, melted cheese, and zesty garlic for a quick lunch or dinner that satisfies you completely.
Ingredients
Main Protein and Cheese:
- 2 chicken breasts
- 1 cup shredded mozzarella cheese
- 1/2 cup shredded cheddar cheese
Wrap and Bread Components:
- 4 large flour tortillas
- 1/4 cup breadcrumbs
Seasoning and Flavor Enhancers:
- 3 cloves garlic
- 2 tbsp olive oil
- 1 tsp salt
- 1/2 tsp black pepper
- 1 tsp dried parsley
- 1/4 tsp garlic powder
Instructions
- Preheat the oven to 375°F and prepare a baking sheet with parchment paper for easy cleanup and non-stick cooking.
- Mince the garlic cloves finely, creating a fragrant base for seasoning the chicken with intense flavor.
- Pat the chicken breasts dry using paper towels to ensure optimal seasoning adherence and promote better browning.
- Season the chicken thoroughly with salt, black pepper, garlic powder, and dried parsley, massaging the spices into the meat for maximum flavor penetration.
- Heat olive oil in a large skillet over medium-high heat, then sear the seasoned chicken breasts for 3-4 minutes on each side until golden brown and developing a crispy exterior.
- Transfer the partially cooked chicken to a cutting board and slice into thin, uniform strips that will distribute evenly in the wraps.
- Warm the flour tortillas briefly in the microwave or on a skillet to increase flexibility and prevent cracking during wrapping.
- Sprinkle a generous mixture of mozzarella and cheddar cheese onto each tortilla, creating a melty foundation for the chicken.
- Distribute the sliced chicken evenly across the cheese-covered tortillas, ensuring balanced flavor in each bite.
- Sprinkle breadcrumbs over the chicken to add a delightful crispy texture to the wrap’s interior.
- Carefully roll the tortillas into tight, compact wraps, tucking in the sides to prevent filling from escaping during baking.
- Place the wrapped chicken rolls seam-side down on the prepared baking sheet to maintain their shape.
- Bake in the preheated oven for 15-18 minutes, or until the cheese is completely melted and the tortilla edges turn golden and crisp.
- Remove from the oven and let the wraps rest for 2-3 minutes to allow the cheese to set and cool slightly before serving.
Notes
- Control chicken moisture by patting breasts completely dry before seasoning, ensuring optimal flavor absorption and achieving a perfect golden-brown exterior.
- Experiment with cheese varieties like pepper jack or Swiss for unique flavor profiles that complement the garlic and chicken blend.
- Add extra crunch by mixing panko breadcrumbs with regular breadcrumbs, creating a more textured and interesting wrap interior.
- Make this recipe gluten-free by substituting flour tortillas with large lettuce leaves or gluten-free wraps, maintaining the dish’s delicious essence while accommodating dietary restrictions.
- Prep Time: 15 minutes
- Cook Time: 20-25 minutes
- Category: Lunch, Dinner, Snacks
- Method: Baking
- Cuisine: American
Nutrition
- Serving Size: 4
- Calories: 532
- Sugar: 1 g
- Sodium: 811 mg
- Fat: 25 g
- Saturated Fat: 9 g
- Unsaturated Fat: 16 g
- Trans Fat: 0 g
- Carbohydrates: 43 g
- Fiber: 2 g
- Protein: 35 g
- Cholesterol: 96 mg
Jackson Reid
Founder & Recipe Developer
Expertise
Education
Holyoke Community College – HCC-MGM Culinary Arts Institute
Certificate in Culinary Arts
Focus: Farm-to-table cuisine, sustainable cooking practices, and hands-on kitchen training
Jackson’s love for cooking began one dish at a time. After earning his Culinary Arts Certificate from Holyoke Community College’s HCC-MGM Culinary Arts Institute, he focused on what mattered most: creating recipes that are simple to follow and full of flavor.
At 10 Below Ice Cream, Jackson brings together global influences and a less-is-more approach. His recipes reflect his belief that good food doesn’t need to be complicated; it just needs to make sense, taste great, and feel right.
When he’s not testing ingredients or adjusting seasonings, you’ll find him hiking near Asheville, exploring local markets, or chasing the best light for food photos.