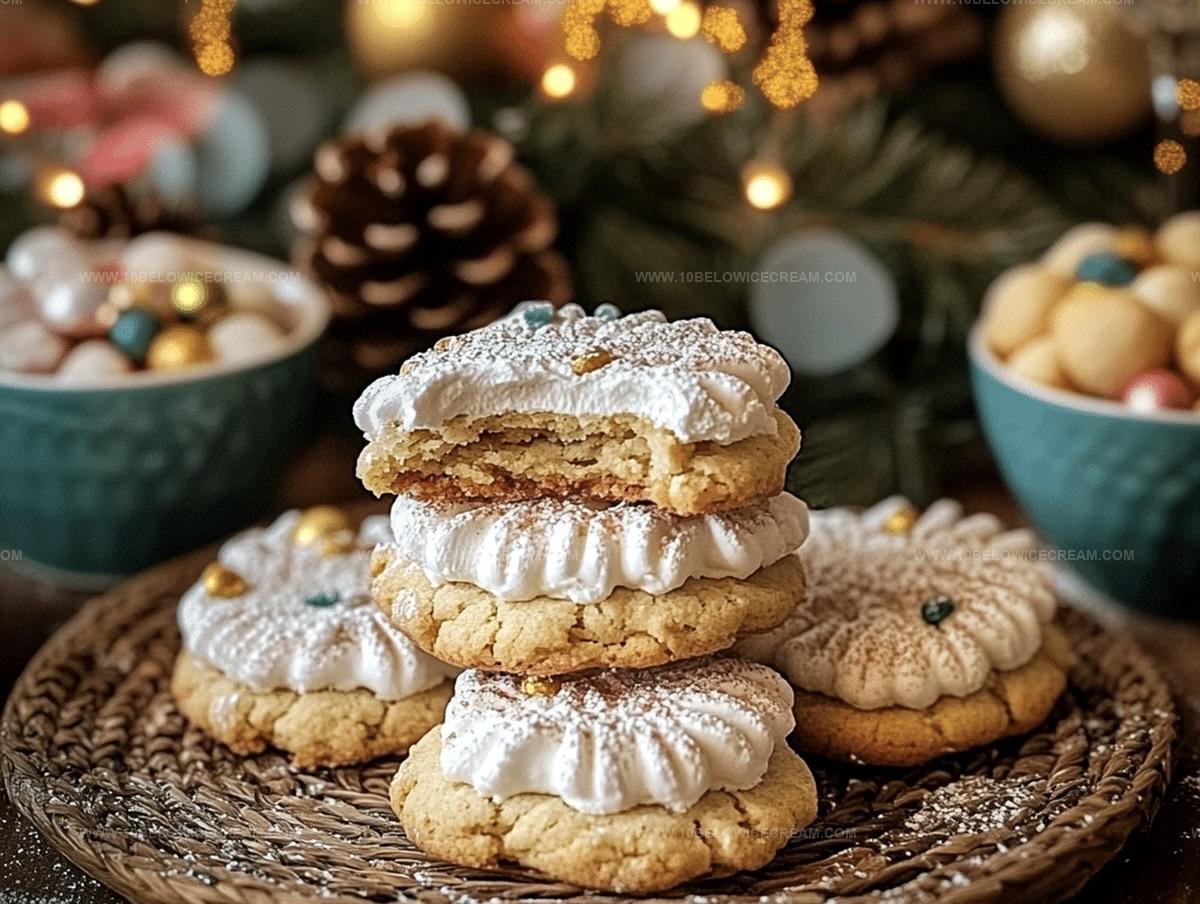
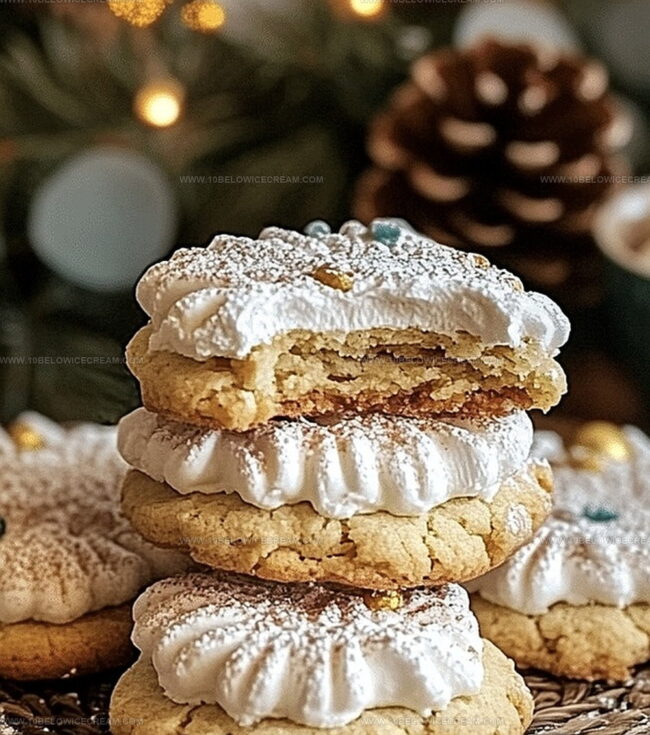
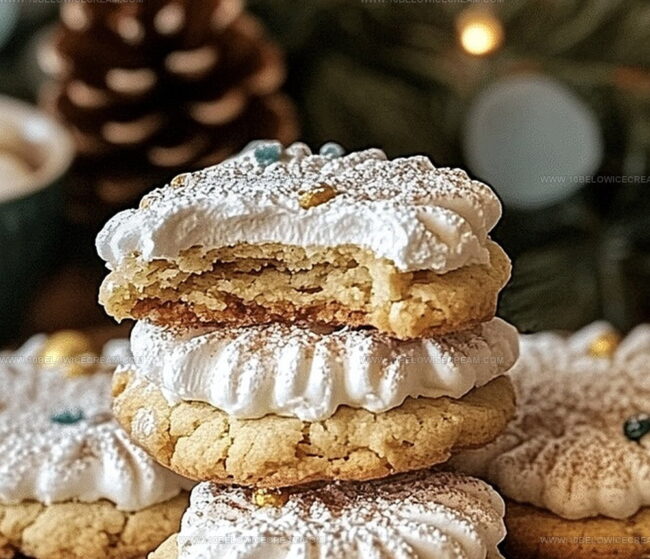
Fluffiest Cool Whip Cookies Recipe for Sweet Tooths
Baking cool whip cookies brings unexpected magic to your dessert lineup.
Soft clouds of sweetness dance across your kitchen counter.
Creamy textures merge with simple ingredients for a delightful treat.
Minimal effort leads to maximum enjoyment with this quick recipe.
Each bite promises a melt-in-your-mouth experience that surprises and delights.
Simple pantry staples combine to create something extraordinary.
You’ll want to whip up a batch and savor every moment of deliciousness.
Why Cool Whip Cookies Are So Popular
What You Need For Cool Whip Cookies
For the Base:For the Moisture and Flavor:For the Coating and Finishing:For the Baking Preparation:How To Bake Cool Whip Cookies
Step 1: Prep the Oven and Baking Surface
Heat the oven to 350°F. Line a baking sheet with parchment paper, creating a smooth surface that will make cookie removal a breeze.
Step 2: Mix the Cookie Dough
Grab a large mixing bowl and combine the ingredients:Stir everything together until you have a soft, pillowy dough with a consistent texture that looks absolutely delicious.
Step 3: Chill the Dough
Pop the dough into the refrigerator for 30 minutes. This helps the dough firm up and makes it easier to shape into perfect little cookie balls.
Step 4: Create a Powdered Sugar Station
Pour powdered sugar into a shallow dish, setting up your coating station for the cookie dough.
Step 5: Shape the Cookies
Take the chilled dough out of the refrigerator. Scoop out small portions and roll each into round balls about 1 inch in diameter.
Step 6: Coat in Powdered Sugar
Roll each dough ball through the powdered sugar, making sure it gets a complete and even coating that looks like a delicate, snowy masterpiece.
Step 7: Arrange on Baking Sheet
Place the sugar-coated cookies on the prepared baking sheet. Space them about 2 inches apart to prevent them from merging during baking.
Step 8: Bake to Perfection
Slide the baking sheet into the oven and bake for 10-12 minutes. Keep an eye out for slightly golden edges and a soft, puffy appearance.
Step 9: Rest the Cookies
Remove the cookies from the oven and let them sit on the baking sheet for 5 minutes. This helps them stabilize and set their structure.
Step 10: Cool and Enjoy
Transfer the cookies to a wire rack and let them cool completely. They’ll develop a mouthwatering, melt-in-your-mouth texture that’s absolutely irresistible.
Tips For The Best Cool Whip Cookies
Easy Twists For Cool Whip Cookies
What Goes Well With Cool Whip Cookies
Storing Cool Whip Cookies For Freshness
Cool Whip Cookies: Your Questions Answered
Cool whip adds moisture and helps create a soft, fluffy texture to the cookies, making them light and tender.
Absolutely! Experiment with white, chocolate, or strawberry cake mix to create different variations of these easy cookies.
Look for slightly golden edges and a puffy appearance. The cookies should still look soft when you remove them from the oven.
No special equipment is needed. Just a mixing bowl, baking sheet, and basic kitchen tools will work perfectly.
Print
Cool Whip Cookies Recipe
- Total Time: 42 minutes
- Yield: 24 1x
Description
Delightful cool whip cookies melt in your mouth with cloud-like tenderness and sweet simplicity. Homemade comfort awaits with these effortless treats that bring pure joy to dessert lovers.
Ingredients
Cookies
- 1 package yellow cake mix
- 1 container cool whip
- 1 large egg
Coating
- 1/2 cup powdered sugar
Optional Extras
- 1 tsp vanilla extract
- 1/4 tsp salt
Instructions
- Preheat the oven to 350°F and line a baking sheet with parchment paper, creating a smooth surface for easy cookie removal.
- In a spacious mixing bowl, combine the yellow cake mix, cool whip, egg, vanilla extract, and salt, stirring until a soft, pillowy dough forms with a consistent texture.
- Chill the prepared dough in the refrigerator for 30 minutes, allowing it to firm up and become more manageable for shaping.
- Pour the powdered sugar into a shallow dish, preparing a coating station for the cookie dough balls.
- Remove the chilled dough and scoop out small portions, rolling each into a round ball about 1-inch in diameter.
- Gently roll each dough ball through the powdered sugar, ensuring a complete and even coating that creates a delicate, snowy exterior.
- Arrange the sugar-coated cookies on the prepared baking sheet, spacing them approximately 2 inches apart to prevent merging during baking.
- Bake for 10-12 minutes, watching for edges to turn slightly golden and the cookies to achieve a soft, puffy appearance.
- Remove from the oven and let the cookies rest on the baking sheet for 5 minutes to stabilize their structure.
- Transfer the cookies to a wire rack, allowing them to cool completely and develop a delightful, melt-in-your-mouth texture.
Notes
- Swap the yellow cake mix for gluten-free alternatives to accommodate those with gluten sensitivities.
- Reduce sugar content by using a sugar-free cake mix and powdered erythritol for a lower-carb version.
- Experiment with different flavor extracts like almond or lemon to create unique taste variations.
- Use cold Cool Whip directly from the refrigerator to ensure the dough maintains its ideal consistency and prevents excessive spreading during baking.
- Prep Time: 30 minutes
- Cook Time: 10-12 minutes
- Category: Desserts, Snacks
- Method: Baking
- Cuisine: American
Nutrition
- Serving Size: 24
- Calories: 90
- Sugar: 4 g
- Sodium: 50 mg
- Fat: 3 g
- Saturated Fat: 1 g
- Unsaturated Fat: 2 g
- Trans Fat: 0 g
- Carbohydrates: 14 g
- Fiber: 0 g
- Protein: 1 g
- Cholesterol: 10 mg
Olivia Brooks
Contributing Writer
Expertise
Education
Culinary Institute of America
Accelerated Culinary Arts Certificate Program
Focus: Culinary fundamentals, nutrition, and healthy cooking technique
Olivia believes good food should feed both the body and the soul. She earned her Accelerated Culinary Arts Certificate from the Culinary Institute of America, where she focused on nutrition and practical cooking techniques that make healthy eating easy.
At 10 Below Ice Cream, Olivia shares single-serving recipes that are fresh, plant-forward, and full of heart. She loves helping people eat better, without stress, strict rules, or sacrificing flavor.
Beyond the kitchen, Olivia spends her time tending her backyard garden, practicing yoga, and discovering hidden gems in Portland’s food scene.