
The Fluffiest Coconut Pyramids Recipe for Sweet Tooth Lovers
Sweet coconut pyramids have become my absolute passion lately!
Baking these delightful treats connects me to childhood memories of tropical desserts.
Crafting these elegant sweets requires minimal ingredients and surprisingly simple techniques.
Rich, shredded coconut combines perfectly with just enough sweetness to create irresistible small mounds.
Delicate and light, these pyramids look impressive on any dessert table.
Each bite promises a gentle crunch and mellow coconut flavor that melts beautifully.
You will adore how quickly these come together in your kitchen.
Come explore this simple yet magical recipe that turns basic ingredients into something extraordinary!
Ingredients Needed For Mary Berry Coconut Pyramids
Base Ingredients:Binding and Flavor Ingredients:Finishing Ingredients:Steps To Make Mary Berry Coconut Pyramids

Step 1: Combine Creamy Coconut Mixture
In a spacious mixing bowl, blend shredded coconut, sweet condensed milk, powdered sugar, softened butter, and fragrant vanilla extract. Stir everything together until the ingredients form a sticky, cohesive mixture that holds its shape when pressed.
Step 2: Craft Tempting Pyramid Shapes
Using clean hands, gently mold the coconut mixture into triangular pyramid shapes. Each pyramid should be roughly the same size, creating a uniform look. Carefully place these delightful treats onto a baking sheet lined with parchment paper.
Step 3: Initial Chilling Phase
Transfer the baking sheet to the refrigerator and let the coconut pyramids chill for one full hour. This cooling period helps the pyramids firm up and maintain their distinctive shape.
Step 4: Create Chocolate Drizzle
Melt chocolate using a double boiler or microwave, stirring until smooth and glossy. Once melted, use a spoon or piping bag to generously drizzle the chocolate over each coconut pyramid, allowing it to cascade down the sides in elegant streams.
Step 5: Final Chilling and Setting
Return the chocolate-covered pyramids to the refrigerator for an additional 30 minutes. This ensures the chocolate coating becomes completely firm and creates a delectable shell around the coconut base.
Step 6: Finishing Touches
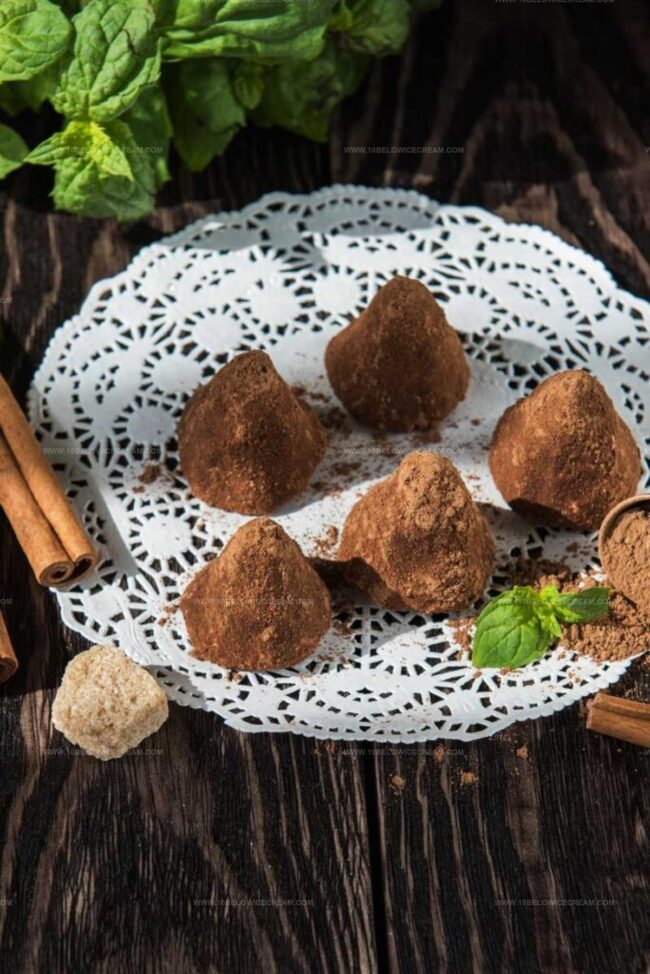
Optional: Lightly dust the pyramids with cocoa powder for an extra touch of elegance. Serve chilled and enjoy these decadent treats that combine creamy coconut and rich chocolate.
Tips To Help With Mary Berry Coconut Pyramids
Tasty Variations Of Mary Berry Coconut Pyramids
Best Pairings For Mary Berry Coconut Pyramids
How To Store Mary Berry Coconut Pyramids Easily
Mary Berry Coconut Pyramids FAQ Section
Yes, but shredded coconut is larger and might change the texture. For best results, process shredded coconut in a food processor to make it finer.
No, you can use untoasted coconut directly. Toasting is optional and depends on personal preference for a deeper, nuttier flavor.
These treats will stay fresh in an airtight container in the refrigerator for up to 5 days. Always keep them chilled to maintain their shape and texture.
Absolutely! You can freeze them for up to 3 weeks. Place them in a single layer in a freezer-safe container between parchment paper layers.
Why Mary Berry Coconut Pyramids Are So Fun

Coconut Pyramids Recipe
- Total Time: 1 hour 45 minutes
- Yield: 8 1x
Description
Heavenly coconut pyramids blend tropical sweetness with delicate texture, creating a simple yet elegant dessert. Rich, creamy coconut treats will delight your palate and transport taste buds to a Mediterranean paradise.
Ingredients
Coconut Base:
- 200 grams (7.05 ounces) desiccated coconut
- 200 grams (7.05 ounces) condensed milk
- 50 grams (1.76 ounces) unsalted butter, melted
Sweeteners and Flavor:
- 100 grams (3.53 ounces) icing sugar
- 1 teaspoon vanilla extract
Coating and Decoration:
- 150 grams (5.29 ounces) dark chocolate
- Cocoa powder (optional)
Instructions
- Combine shredded coconut, sweetened condensed milk, powdered sugar, softened butter, and vanilla extract in a mixing bowl, blending until a cohesive mixture forms.
- Using slightly dampened hands, carefully mold the mixture into triangular pyramid shapes, ensuring each structure is compact and well-defined.
- Arrange the coconut pyramids on a parchment-lined baking sheet, spacing them evenly.
- Refrigerate for 60 minutes to allow the mixture to firm and maintain its pyramid structure.
- Gently melt chocolate using a double boiler or microwave, stirring until smooth and glossy.
- Drizzle the melted chocolate over each coconut pyramid, creating an artistic pattern that covers the surface.
- Return the decorated pyramids to the refrigerator for an additional 30 minutes, allowing the chocolate to completely set and harden.
- Optional: Lightly dust the chilled pyramids with cocoa powder for an elegant finishing touch.
- Serve chilled and enjoy the rich, tropical-inspired confection.
Notes
- Ensure ingredients are at room temperature for smooth mixing and easier shaping.
- Use desiccated coconut for the best texture and authentic pyramid structure.
- Wet your hands slightly when forming pyramids to prevent sticky mixture from clinging to fingers.
- For a gluten-free version, verify all ingredients are certified gluten-free, especially vanilla and chocolate.
- Create uniform pyramid sizes by using a small ice cream scoop or tablespoon for consistent portioning.
- Store in an airtight container in the refrigerator for up to 5 days to maintain freshness and crisp chocolate coating.
- Experiment with dark, milk, or white chocolate drizzles for different flavor variations.
- Prep Time: 15 minutes
- Cook Time: 0 minutes
- Category: Desserts, Snacks
- Method: Chilling
- Cuisine: Indian
Nutrition
- Serving Size: 8
- Calories: 306
- Sugar: 28g
- Sodium: 19mg
- Fat: 21g
- Saturated Fat: 18g
- Unsaturated Fat: 3g
- Trans Fat: 0g
- Carbohydrates: 22g
- Fiber: 3g
- Protein: 2g
- Cholesterol: 20mg
Jackson Reid
Founder & Recipe Developer
Expertise
Education
Holyoke Community College – HCC-MGM Culinary Arts Institute
Certificate in Culinary Arts
Focus: Farm-to-table cuisine, sustainable cooking practices, and hands-on kitchen training
Jackson’s love for cooking began one dish at a time. After earning his Culinary Arts Certificate from Holyoke Community College’s HCC-MGM Culinary Arts Institute, he focused on what mattered most: creating recipes that are simple to follow and full of flavor.
At 10 Below Ice Cream, Jackson brings together global influences and a less-is-more approach. His recipes reflect his belief that good food doesn’t need to be complicated; it just needs to make sense, taste great, and feel right.
When he’s not testing ingredients or adjusting seasonings, you’ll find him hiking near Asheville, exploring local markets, or chasing the best light for food photos.