
The Best Chocolate Swiss Roll Recipe for Sweet Indulgence
Sweet dreams come alive with this decadent chocolate swiss roll that promises pure indulgence.
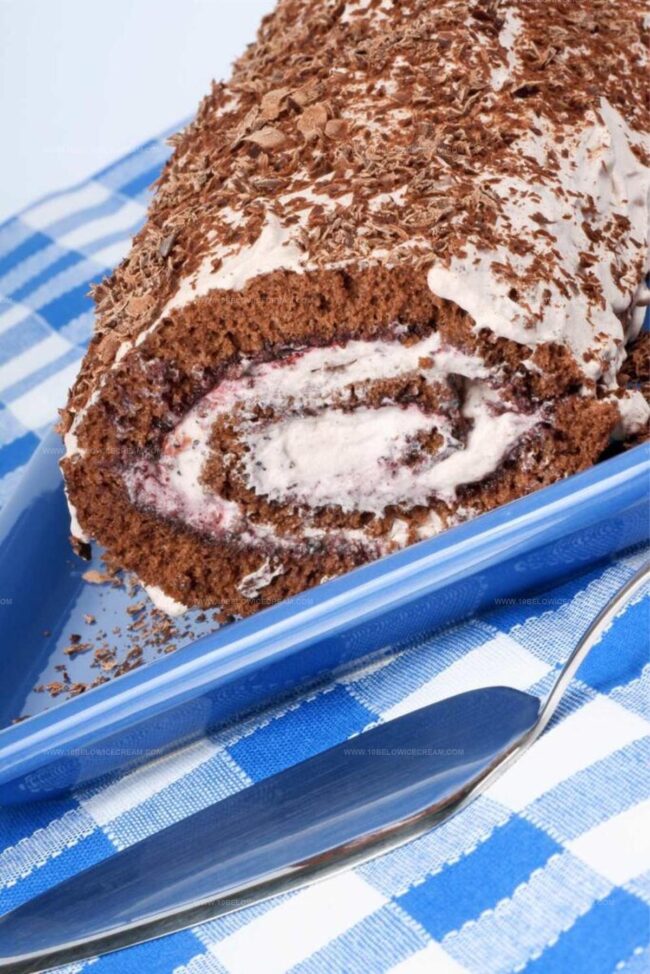
Layers of rich, velvety cake wrap around a cloud-like cream filling.
Delicate and light, each slice melts seamlessly on your tongue.
Chocolate lovers will fall head over heels for this elegant dessert.
Mastering this recipe feels like unlocking a secret culinary treasure.
Whispers of cocoa and gentle sweetness dance through every tender bite.
You won’t be able to resist cutting another slice of this irresistible treat.
What Makes Mary Berry Chocolate Swiss Roll A Favorite
Ingredients Needed For Mary Berry Chocolate Swiss Roll
Cake Base:Filling and Topping:Baking Essentials:Steps To Prepare Mary Berry Chocolate Swiss Roll

Step 1: Warm Up the Oven
Crank your oven to a toasty 220°C (425°F). Grab a Swiss roll tin and line it completely with parchment paper, making sure every corner is covered.
Step 2: Create Fluffy Chocolate Batter
Grab your electric mixer and whip eggs and sugar together until they transform into a pale, thick, and dreamy mixture. Gently fold in cocoa powder and flour, blending carefully to keep all that beautiful air you’ve whipped into the eggs.
Step 3: Bake to Perfection
Pour the chocolatey batter into your prepared tin, spreading it evenly. Slide the tin into the hot oven and bake for 9-10 minutes. The cake should look set and spring back when lightly touched.
Step 4: Roll While Warm
Immediately after removing from the oven, flip the cake onto a towel generously dusted with sugar. Carefully roll the cake with the towel, starting from the short end. This helps the cake keep its shape and prevents cracking.
Step 5: Prepare Dreamy Filling
Whip heavy cream with vanilla and powdered sugar until it forms soft, billowy peaks. The filling should be light and airy, ready to complement the chocolate sponge.
Step 6: Assemble the Swiss Roll
Gently unroll the cooled cake. Spread the whipped cream evenly across the surface, leaving a small border around the edges. Carefully roll the cake back up, this time without the towel.
Step 7: Final Touch
Transfer your Swiss roll to a serving plate. Dust the top generously with powdered sugar, creating a beautiful snow-like finish. Slice into elegant rounds and serve immediately.
Tips To Nail Mary Berry Chocolate Swiss Roll
Tasty Twists On Mary Berry Chocolate Swiss Roll
What Pairs Well With Mary Berry Chocolate Swiss Roll
How To Store Mary Berry Chocolate Swiss Roll The Right Way
Common Questions On Mary Berry Chocolate Swiss Roll
The key ingredients are eggs, sugar, cocoa powder, and flour. Whisking eggs and sugar until pale and thick creates the light, airy texture that makes Swiss rolls so delicate and delicious.
Roll the sponge while it’s still warm and use a sugared towel to help prevent cracking. The warmth and sugar help the cake remain flexible and reduces the chances of breaking during the rolling process.
Yes, you can prepare the Swiss roll in advance. Once filled and rolled, wrap it tightly in plastic wrap and store in the refrigerator. This allows the flavors to meld and makes it easier to slice.
Print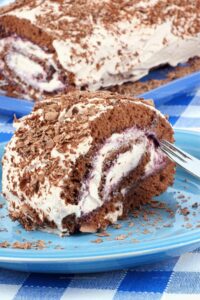
Chocolate Swiss Roll Recipe
- Total Time: 19-20 mins
- Yield: 3 1x
Description
Rich chocolate Swiss roll delights dessert enthusiasts with its elegant spiral of velvety chocolate cake and creamy filling. Delicate layers melt seamlessly, promising a luxurious experience that transports you to European pastry perfection.
Ingredients
Main Ingredients:
- 3 eggs
- 75g (2.6 ounces) golden caster sugar
- 60g (2.1 ounces) self-raising flour
- 3 tablespoons cocoa powder
Filling Ingredients:
- 200 milliliters (6.8 fluid ounces) double cream
- 50g (1.8 ounces) icing sugar
Flavoring:
- 12 teaspoons vanilla extract
Instructions
- Prepare the oven at 220°C and line a Swiss roll tin with parchment paper, ensuring complete coverage.
- Vigorously whisk eggs and sugar until the mixture transforms into a pale, voluminous, and thick consistency, then gently fold in sifted cocoa powder and flour until evenly incorporated.
- Bake the delicate sponge for 9-10 minutes, watching carefully to prevent overcooking and maintain a soft texture.
- Immediately transfer the hot sponge onto a sugar-dusted kitchen towel and carefully roll the cake while still warm, allowing it to cool in a rolled shape and prevent cracking.
- While the cake cools, whip cream with vanilla and icing sugar until it forms soft, billowy peaks with a smooth texture.
- Gently unroll the cooled sponge cake, spreading the whipped cream evenly across the surface, leaving a small border around the edges.
- Carefully roll the cake again, encasing the cream filling, and place seam-side down on a serving platter.
- Dust the exterior with a light coating of icing sugar, creating an elegant finish.
- Slice the Swiss roll into neat portions and serve at room temperature for optimal flavor and texture.
Notes
- Ensure eggs are at room temperature for maximum volume when whisking, creating a lighter, fluffier sponge.
- Use a clean kitchen towel dusted with powdered sugar to prevent sticking and help roll the cake smoothly while warm.
- Whip cream just until soft peaks form to avoid over-beating, which can make the filling grainy and less smooth.
- For a gluten-free version, substitute regular flour with almond flour or a gluten-free flour blend, maintaining the cake’s delicate texture.
- Prep Time: 10 mins
- Cook Time: 9-10 mins
- Category: Desserts
- Method: Baking
- Cuisine: Swiss
Nutrition
- Serving Size: 3
- Calories: 296 kcal
- Sugar: 24 g
- Sodium: 100 mg
- Fat: 20 g
- Saturated Fat: 12 g
- Unsaturated Fat: 6 g
- Trans Fat: 0.2 g
- Carbohydrates: 26 g
- Fiber: 3 g
- Protein: 5 g
- Cholesterol: 110 mg
Jackson Reid
Founder & Recipe Developer
Expertise
Education
Holyoke Community College – HCC-MGM Culinary Arts Institute
Certificate in Culinary Arts
Focus: Farm-to-table cuisine, sustainable cooking practices, and hands-on kitchen training
Jackson’s love for cooking began one dish at a time. After earning his Culinary Arts Certificate from Holyoke Community College’s HCC-MGM Culinary Arts Institute, he focused on what mattered most: creating recipes that are simple to follow and full of flavor.
At 10 Below Ice Cream, Jackson brings together global influences and a less-is-more approach. His recipes reflect his belief that good food doesn’t need to be complicated; it just needs to make sense, taste great, and feel right.
When he’s not testing ingredients or adjusting seasonings, you’ll find him hiking near Asheville, exploring local markets, or chasing the best light for food photos.