
Quick & Sweet Banana Pudding Cheesecake Bars Recipe
Creamy banana pudding cheesecake bars bring comfort straight to your plate with a nostalgic twist.
Layers of smooth cream cheese meld perfectly with sweet banana essence.
Southern kitchens have long celebrated this delightful dessert that combines classic flavors.
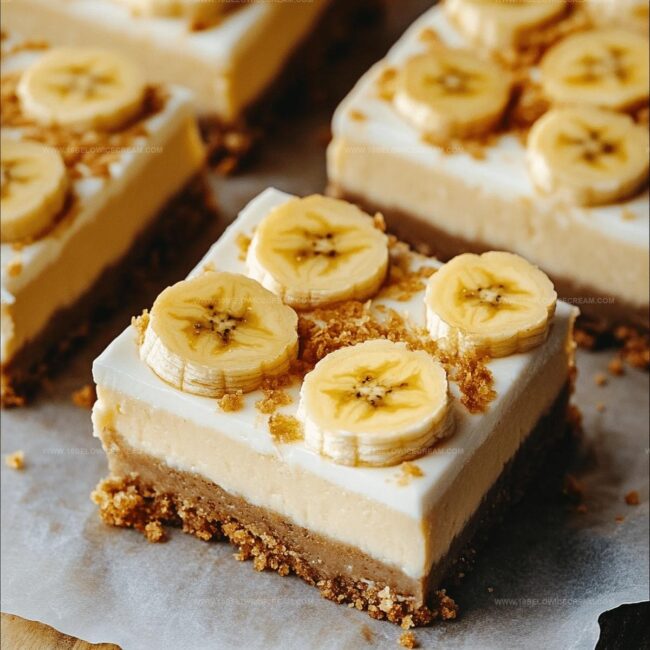
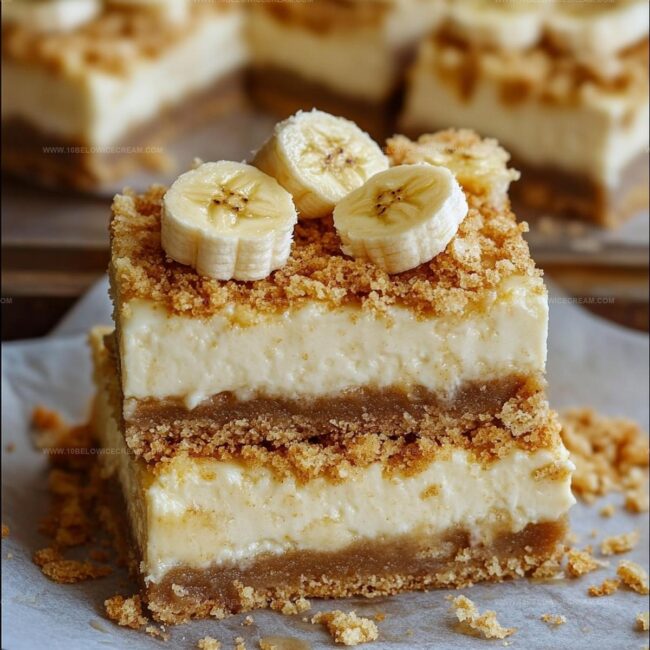
Soft graham cracker crusts provide a delicate crunch against silky pudding-infused filling.
Rich textures and decadent notes promise an indulgent experience for anyone seeking a classic treat.
Crumbling cookies and whipped cream add playful dimensions to each delectable bite.
You’ll want to slice these bars and savor every single moment of deliciousness.
Why Banana Pudding Cheesecake Bars Are A Must-Make
Ingredients For Banana Pudding Cheesecake Bars
For the Crust:For the Filling:For the Topping and Garnish:Directions To Prepare Banana Pudding Cheesecake Bars
Step 1: Prepare Baking Surface
Line a 9×13-inch baking pan with parchment paper, allowing extra paper to hang over sides for easy lifting later.
Step 2: Create Crumbly Crust
Mix graham cracker crumbs with melted butter and press the mixture firmly into the bottom of the pan, creating a solid foundation for the cheesecake bars.
Step 3: Whip Cream Cheese Base
In a large mixing bowl, beat cream cheese until it becomes incredibly smooth and creamy. Gradually add sugar, mixing until the mixture is completely combined and silky.
Step 4: Blend Filling Ingredients
Incorporate eggs one at a time, ensuring each is fully mixed before adding the next. Gently fold in the following ingredients:Continue mixing until the filling is uniform and luxuriously smooth.
Step 5: Pour and Spread Cheesecake Layer
Transfer the creamy filling over the graham cracker crust, using a spatula to spread it evenly and create a perfectly flat surface.
Step 6: Bake to Perfection
Place the pan in a preheated oven at 325°F. Bake for 35-40 minutes, watching for a slightly jiggly center that indicates ideal doneness. Avoid over-baking to maintain a luscious, creamy texture.
Step 7: Cool and Chill
Allow the cheesecake to cool completely at room temperature. Refrigerate for at least 3 hours or overnight to ensure complete setting.
Step 8: Dress with Whipped Cream
Top the chilled bars with a generous layer of fluffy whipped cream, creating a cloud-like surface.
Step 9: Add Fresh Banana Accents
Arrange fresh banana slices artfully across the whipped cream topping.
Step 10: Drizzle and Decorate
Gracefully drizzle caramel sauce over the banana slices, creating an elegant pattern.
Step 11: Add Crunchy Finishing Touch
Sprinkle crushed vanilla wafers over the top, providing a delightful textural contrast and visual appeal.
Step 12: Serve and Enjoy
Slice into squares and serve chilled, savoring the delightful combination of creamy cheesecake and classic banana pudding flavors.
Tips For Banana Pudding Cheesecake Bars
Flavor Options For Banana Pudding Cheesecake Bars
What To Serve With Banana Pudding Cheesecake Bars
Storing Banana Pudding Cheesecake Bars Properly
Questions About Banana Pudding Cheesecake Bars
Yes, you can substitute graham cracker crumbs with crushed vanilla wafers or digestive biscuits for a unique base flavor.
Use very ripe, almost completely brown bananas for the most intense, sweet banana flavor in the cheesecake bars.
Absolutely! Replace graham cracker crumbs with gluten-free cookie crumbs or almond flour to create a gluten-free version.
Yes, wrap the bars tightly in plastic wrap and store in the freezer for up to 2 months. Thaw in the refrigerator overnight before serving.
Print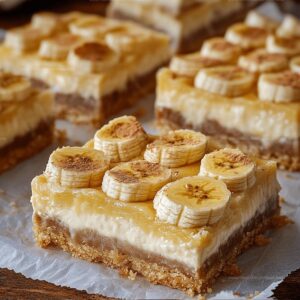
Banana Pudding Cheesecake Bars Recipe
- Total Time: 3 hours 55-60 minutes
- Yield: 8 1x
Description
Southern comfort meets creamy indulgence in these banana pudding cheesecake bars, blending classic dessert nostalgia with rich, smooth layers. Cream cheese, ripe bananas, and vanilla wafer crust unite to deliver a dessert that will make you swoon with pure Southern delight.
Ingredients
Crust:
- 2 cups graham cracker crumbs
- 1/2 cup unsalted butter, melted
Cheesecake Filling:
- 16 oz cream cheese, softened
- 1/2 cup granulated sugar
- 2 large eggs
- 1/4 cup sour cream
- 2 ripe bananas, mashed
- 1 tsp vanilla extract
Topping:
- 1 cup whipped cream
- 2 bananas, sliced
- 1/4 cup caramel sauce
- 1/4 cup crushed vanilla wafers
Instructions
- Preheat the oven to 325°F and line a 9×13-inch baking pan with parchment paper, allowing excess to hang over the sides for easy removal.
- Combine graham cracker crumbs with melted butter, pressing the mixture firmly and evenly into the bottom of the prepared pan to create a compact crust.
- In a large mixing bowl, whip cream cheese until smooth and creamy, gradually incorporating granulated sugar until fully integrated.
- Blend in eggs one at a time, ensuring each is thoroughly mixed before adding the next, then fold in sour cream, mashed bananas, and vanilla extract until the filling is uniform and silky.
- Pour the cheesecake mixture over the prepared graham cracker crust, spreading it evenly with a spatula to create a smooth surface.
- Bake for 35-40 minutes, or until the center is almost set but still slightly jiggly, avoiding over-baking to maintain a creamy texture.
- Remove from the oven and allow to cool completely at room temperature, then refrigerate for at least 3 hours or overnight to set fully.
- Before serving, garnish the chilled bars with a generous layer of whipped cream, arranging fresh banana slices strategically across the top.
- Drizzle caramel sauce in an elegant pattern over the whipped cream and banana slices.
- Sprinkle crushed vanilla wafers as a final decorative and textural element, creating a visually appealing and crunchy topping.
- Cut into squares and serve chilled, enjoying the harmonious blend of creamy cheesecake and classic banana pudding flavors.
Notes
- Select perfectly ripe bananas with yellow peels and minimal brown spots for the most intense, natural sweetness in your cheesecake bars.
- Use room temperature cream cheese and eggs to ensure smooth blending and prevent lumpy texture during mixing.
- Gently tap the baking pan on the counter after pouring the filling to release any trapped air bubbles, which helps create a silky, uniform cheesecake surface.
- Wrap the outside of the baking pan with aluminum foil to prevent potential moisture seepage and ensure even baking of the delicate cheesecake layers.
- Prep Time: 20 minutes
- Cook Time: 35-40 minutes
- Category: Desserts, Snacks
- Method: Baking
- Cuisine: American
Nutrition
- Serving Size: 8
- Calories: 350
- Sugar: 20 g
- Sodium: 250 mg
- Fat: 22 g
- Saturated Fat: 12 g
- Unsaturated Fat: 8 g
- Trans Fat: 0 g
- Carbohydrates: 36 g
- Fiber: 1 g
- Protein: 5 g
- Cholesterol: 70 mg
Olivia Brooks
Contributing Writer
Expertise
Education
Culinary Institute of America
Accelerated Culinary Arts Certificate Program
Focus: Culinary fundamentals, nutrition, and healthy cooking technique
Olivia believes good food should feed both the body and the soul. She earned her Accelerated Culinary Arts Certificate from the Culinary Institute of America, where she focused on nutrition and practical cooking techniques that make healthy eating easy.
At 10 Below Ice Cream, Olivia shares single-serving recipes that are fresh, plant-forward, and full of heart. She loves helping people eat better, without stress, strict rules, or sacrificing flavor.
Beyond the kitchen, Olivia spends her time tending her backyard garden, practicing yoga, and discovering hidden gems in Portland’s food scene.