
Zesty Avocado Sushi Cake Recipe: A Playful Twist on Classic Rolls
Every chef dreams of creating a jaw-dropping avocado sushi cake that surprises guests with its unexpected presentation.
Rolled seaweed sheets and creamy green layers promise a culinary adventure beyond traditional rolls.
Delicate textures blend Japanese inspiration with modern plating techniques.
Soft rice cushions nestle between rich avocado spreads, creating visual drama on your plate.
Skilled home cooks can master this elegant dish with simple ingredients and patience.
Professional-looking results await you with careful assembly and playful creativity.
Step into a world where sushi becomes an artistic canvas waiting to be explored.
Tips To Master Avocado Sushi Cake
Creative Versions Of Avocado Sushi Cake
What To Serve With Avocado Sushi Cake
How To Store Avocado Sushi Cake Properly
FAQ Guide For Avocado Sushi Cake
No, the recipe contains smoked salmon, making it non-vegetarian. Vegetarians would need to replace salmon with alternatives like tofu or skip the fish layer.
You can prepare components separately ahead of time, but assemble just before serving to maintain optimal texture and prevent rice from drying out.
Short-grain sushi rice is essential. Regular long-grain rice won’t have the sticky consistency needed to hold the cake’s structure.
A springform pan or cake mold with plastic wrap works perfectly. A rice cooker helps, but you can also cook rice on a stovetop.
Why Avocado Sushi Cake Is A Fresh Surprise
What You Need For Avocado Sushi Cake
For the Base and Main Ingredients:For the Seasoning and Flavor Enhancers:For the Garnish and Decoration:How To Put Together Avocado Sushi Cake
Step 1: Wash The Rice
Rinse sushi rice under cold water until water becomes crystal clear, then drain completely. The thorough washing removes excess starch for perfect texture.
Step 2: Cook Rice Perfectly
Use a rice cooker or pot to cook rice following package guidelines. Precise water measurement ensures optimal rice consistency.
Step 3: Prepare Seasoning Blend
Whisk together:In a small bowl until ingredients dissolve completely, creating a flavorful seasoning mixture.
Step 4: Season Rice
Transfer cooked rice to a large mixing bowl. Gently fold vinegar mixture using a cutting motion to prevent grain damage. This technique helps maintain rice integrity.
Step 5: Cool Rice Strategically
Allow rice to reach room temperature. Occasionally fan the rice to release steam and develop glossy, separated grains with a beautiful sheen.
Step 6: Create Avocado Layer
Mash ripe avocados with lemon juice and salt until achieving a smooth, creamy consistency. The mixture should feel silky and spreadable.
Step 7: Prepare Cake Mold
Select a springform pan or cake mold. Line completely with plastic wrap to facilitate easy cake removal later.
Step 8: Build First Rice Layer
Press half the seasoned rice firmly into pan bottom. Create a compact, even base that will support subsequent layers.
Step 9: Add Avocado Spread
Distribute mashed avocado mixture evenly across rice layer. Ensure smooth, consistent coverage for beautiful presentation.
Step 10: Complete Final Rice Layer
Top avocado with remaining rice. Gently press to create a cohesive cake structure that holds together beautifully.
Step 11: Unmold Sushi Cake
Carefully invert pan onto serving platter, allowing cake to release smoothly.
Step 12: Decorate With Salmon
Drape thin smoked salmon slices artfully across cake surface, creating an elegant pattern.
Step 13: Add Nori Accents
Cut nori sheets into decorative strips or shapes. Arrange strategically across cake for visual interest.
Step 14: Finish With Sesame
Sprinkle sesame seeds around cake edges, adding delightful texture and visual appeal.
Step 15: Serve Beautifully
Present immediately with small wasabi and soy sauce dishes for personalized dipping experiences.
Print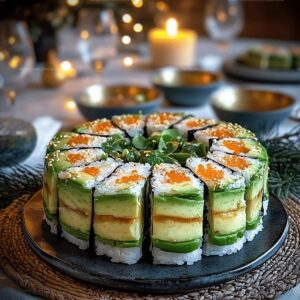
Avocado Sushi Cake Recipe
- Total Time: 50 minutes
- Yield: 4 1x
Description
Creamy avocado sushi cake brings Japanese culinary artistry to your dining table with an unexpected twist on traditional rolls. Layers of sushi rice, fresh salmon, and smooth avocado create a delightful centerpiece that will impress guests and satisfy sushi cravings.
Ingredients
Sushi Components:
- 2 cups sushi rice
- 1/4 cup rice vinegar
- 2 tbsp sugar
- 1 tsp salt
Avocado Layer:
- 3 ripe avocados
- 1 tbsp lemon juice
- 1/2 tsp salt
Garnish and Decoration:
- 4 oz smoked salmon
- 2 nori sheets
- 1 tbsp sesame seeds
- 2 tbsp wasabi paste
- 2 tbsp soy sauce
Instructions
- Rinse sushi rice thoroughly under cold water until the water runs clear, then drain completely.
- In a rice cooker or pot, cook rice according to package instructions, ensuring precise water measurement for perfect texture.
- While rice is cooking, prepare seasoning by whisking rice vinegar, sugar, and salt in a small bowl until completely dissolved.
- Once rice is cooked, transfer to a large mixing bowl and gently fold in the vinegar mixture using a cutting motion to prevent mashing the grains.
- Allow rice to cool to room temperature, occasionally fanning to help release steam and achieve glossy, separated grains.
- Mash ripe avocados with lemon juice and salt until smooth and creamy, creating a silky green layer.
- Select a springform pan or cake mold and line with plastic wrap for easy removal.
- Press half the seasoned rice firmly into the bottom of the pan, creating a compact, even base.
- Spread the mashed avocado mixture evenly over the rice layer, ensuring smooth coverage.
- Top the avocado layer with remaining rice, gently pressing to create a cohesive cake structure.
- Carefully unmold the sushi cake onto a serving platter by inverting the pan.
- Drape thin slices of smoked salmon artfully across the top surface.
- Cut nori sheets into decorative strips or shapes and arrange on the cake.
- Sprinkle sesame seeds around the edges for added texture and visual appeal.
- Serve immediately with small dishes of wasabi paste and soy sauce on the side for individual dipping.
Notes
- Select short-grain sushi rice for the best sticky texture that holds together perfectly when molded into a cake shape.
- Use room temperature avocados for smoother mashing and easier spreading across the rice layer.
- Rinse rice multiple times to remove excess starch, ensuring grains remain separate and fluffy after cooking.
- Fold rice seasoning gently to prevent breaking delicate grains and maintain a light, airy consistency.
- Chill the sushi cake for 30 minutes before serving to help it set and make slicing easier.
- For a vegetarian version, replace smoked salmon with thinly sliced cucumber or marinated tofu.
- Add extra flavor by mixing wasabi or sriracha into the avocado layer for a spicy kick.
- Create a gluten-free option by using tamari instead of traditional soy sauce for dipping.
- Prep Time: 20 minutes
- Cook Time: 30 minutes
- Category: Lunch, Dinner, Appetizer, Snacks
- Method: Steaming
- Cuisine: Japanese
Nutrition
- Serving Size: 4
- Calories: 400
- Sugar: 3g
- Sodium: 900mg
- Fat: 22g
- Saturated Fat: 4g
- Unsaturated Fat: 16g
- Trans Fat: 0g
- Carbohydrates: 45g
- Fiber: 6g
- Protein: 10g
- Cholesterol: 25mg
Olivia Brooks
Contributing Writer
Expertise
Education
Culinary Institute of America
Accelerated Culinary Arts Certificate Program
Focus: Culinary fundamentals, nutrition, and healthy cooking technique
Olivia believes good food should feed both the body and the soul. She earned her Accelerated Culinary Arts Certificate from the Culinary Institute of America, where she focused on nutrition and practical cooking techniques that make healthy eating easy.
At 10 Below Ice Cream, Olivia shares single-serving recipes that are fresh, plant-forward, and full of heart. She loves helping people eat better, without stress, strict rules, or sacrificing flavor.
Beyond the kitchen, Olivia spends her time tending her backyard garden, practicing yoga, and discovering hidden gems in Portland’s food scene.