
Easy Apple Pie Biscuits Recipe: Sweet Comfort in Every Bite
Sweet aromas of cinnamon-dusted apple pie biscuits waft through kitchens, promising comfort in every golden bite.
Flaky layers meld with tender fruit for a delightful twist on classic desserts.
Warm memories surface as buttery dough embraces caramelized apple chunks.
Unexpected combinations create magic when humble ingredients dance together.
Crisp edges and soft centers make these treats irresistible for weekend brunch or afternoon snacking.
Baking becomes an adventure with this playful recipe that surprises and delights.
You’ll fall in love with these simple yet spectacular biscuits that bring joy to the table.
Reasons to Love Apple Pie Biscuits
What Goes Into Apple Pie Biscuits
Main Ingredients:
Flour: A key component that provides structure and texture to the biscuits.
Butter: Adds richness and creates a flaky, tender base for the biscuits.
Milk: Helps bind the ingredients and contributes to the biscuits’ soft texture.
Filling Ingredients:Finishing Ingredients:How to Make Apple Pie Biscuits
Step 1: Prepare Baking Station
Preheat the oven to 425F. Line a baking sheet with parchment paper for easy cleanup and perfect baking.
Step 2: Mix Dry Ingredients
Grab a large mixing bowl and whisk together:Work the cold butter into the dry ingredients using a pastry cutter or your fingertips until the mixture looks like rough breadcrumbs.
Step 3: Combine Wet Ingredients
Pour in milk and vanilla extract. Gently stir until the dough just comes together. Avoid overmixing to keep the biscuits tender.
Step 4: Roll Out Dough
Dust a clean surface with flour. Roll the dough to about half-inch thickness, creating a smooth surface for filling.
Step 5: Prepare Apple Filling
In a separate bowl, mix:Toss the ingredients until apples are evenly coated.
Step 6: Form Biscuit Pockets
Cut the dough into 3-inch squares. Spoon apple filling into the center of each square. Carefully fold the corners upward and press to seal, creating little apple-filled pockets.
Step 7: Bake to Golden Perfection
Arrange the biscuits on the prepared baking sheet. Bake for 12-15 minutes until they turn a beautiful golden brown.
Step 8: Create Sweet Glaze
Whisk together:Drizzle the smooth glaze over warm biscuits for an extra touch of sweetness.
Step 9: Serve and Savor
Serve the biscuits warm, watching as everyone enjoys these incredible apple pie-inspired treats.
Tips for Perfect Apple Pie Biscuits
Flavorful Variations of Apple Pie Biscuits
Pairings That Complement Apple Pie Biscuits
Best Ways to Store Apple Pie Biscuits
Common Questions About Apple Pie Biscuits
Yes, you can use Granny Smith, Honeycrisp, or Fuji apples. Choose firm apples that hold their shape during baking and provide a nice balance of sweetness and tartness.
Absolutely! You can prepare the dough and refrigerate it for up to 24 hours before baking. Just wrap it tightly in plastic wrap to prevent drying out.
Look for a golden brown color on the edges and top. The biscuits should be firm to the touch but not dark brown, which would indicate overcooking.
Print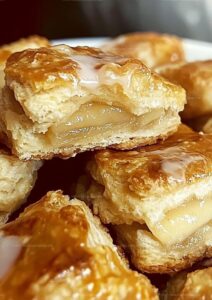
Apple Pie Biscuits Recipe
- Total Time: 27-30 minutes
- Yield: 8 1x
Description
Comforting apple pie biscuits blend classic American dessert flavors into a delightful breakfast treat. Buttery biscuits topped with caramelized cinnamon apples offer sweet morning indulgence you can savor with coffee or tea.
Ingredients
Main Ingredients:
- 2 cups (280 grams) all-purpose flour
- 1/2 cup (113 grams) cold unsalted butter, cut into small pieces
- 3/4 cup (180 milliliters) milk
Sweet Ingredients:
- 1/4 cup (50 grams) granulated sugar
- 1 teaspoon vanilla extract
Leavening and Seasoning:
- 1 tablespoon baking powder
- 1/2 teaspoon salt
Instructions
- Preheat the oven to 425F (220C) and prepare a baking sheet with parchment paper.
- Blend dry ingredients in a large mixing bowl, incorporating cold butter until the texture resembles rough breadcrumbs.
- Gently mix milk and vanilla into the dough, ensuring minimal stirring to maintain a tender consistency.
- Transfer the dough onto a lightly dusted work surface and flatten to approximately half-inch thickness.
- Create the apple mixture by combining diced fruit with sugar, cinnamon, and flour, mixing thoroughly.
- Transform the dough into 3-inch square sections, positioning a generous apple filling dollop at the center of each piece.
- Carefully fold the dough corners upward, pressing edges together to create sealed parcels.
- Arrange the assembled biscuits on the prepared baking sheet, allowing slight spacing between each piece.
- Bake for 12-15 minutes until the exterior achieves a rich golden-brown coloration.
- Craft a smooth glaze by whisking powdered sugar with milk and vanilla extract.
- Once removed from the oven, delicately drizzle the glaze over the warm biscuits.
- Serve immediately to savor the optimal texture and warmth of these delectable treats.
Notes
- Butter Temperature Matters: Keep butter extremely cold and work quickly to ensure flaky, tender biscuit texture.
- Apple Selection Tip: Choose firm, tart apples like Granny Smith or Honeycrisp for best filling consistency and balanced sweetness.
- Gluten-Free Alternative: Swap regular flour with a cup-for-cup gluten-free blend to make the recipe accessible for those with wheat sensitivities.
- Prevent Soggy Bottom: Lightly dust apple filling with flour to absorb excess moisture and prevent biscuits from becoming wet underneath.
- Prep Time: 15 minutes
- Cook Time: 12-15 minutes
- Category: Breakfast, Snacks, Desserts
- Method: Baking
- Cuisine: American
Nutrition
- Serving Size: 8
- Calories: 198 kcal
- Sugar: 6 g
- Sodium: 236 mg
- Fat: 8 g
- Saturated Fat: 5 g
- Unsaturated Fat: 3 g
- Trans Fat: 0.2 g
- Carbohydrates: 27 g
- Fiber: 1 g
- Protein: 4 g
- Cholesterol: 16 mg
Olivia Brooks
Contributing Writer
Expertise
Education
Culinary Institute of America
Accelerated Culinary Arts Certificate Program
Focus: Culinary fundamentals, nutrition, and healthy cooking technique
Olivia believes good food should feed both the body and the soul. She earned her Accelerated Culinary Arts Certificate from the Culinary Institute of America, where she focused on nutrition and practical cooking techniques that make healthy eating easy.
At 10 Below Ice Cream, Olivia shares single-serving recipes that are fresh, plant-forward, and full of heart. She loves helping people eat better, without stress, strict rules, or sacrificing flavor.
Beyond the kitchen, Olivia spends her time tending her backyard garden, practicing yoga, and discovering hidden gems in Portland’s food scene.